Components
COMPONENTS
ILLUSTRATION
|
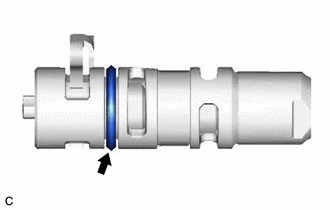
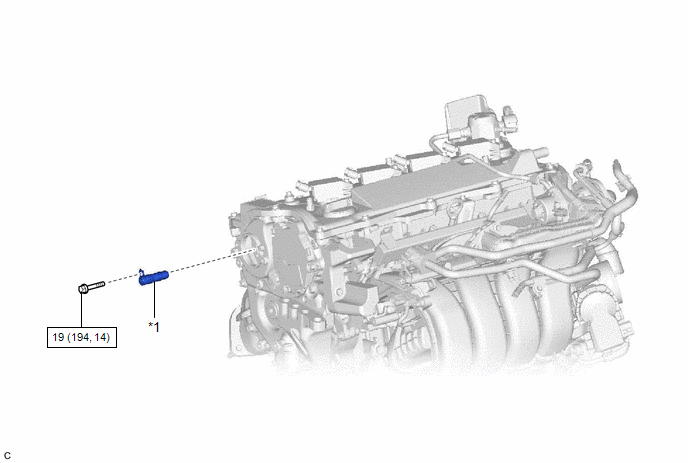
*1 | CAMSHAFT TIMING OIL CONTROL VALVE ASSEMBLY (EXHAUST CAMSHAFT TIMING GEAR BOLT ASSEMBLY) |
- | - |
 |
N*m (kgf*cm, ft.*lbf): Specified torque |
- | - |
Installation
INSTALLATION
CAUTION / NOTICE / HINT
NOTICE:
This procedure includes the installation of small-head bolts. Refer to Small-Head Bolts of Basic Repair Hint to identify the small-head bolts.
Click here

PROCEDURE
1. INSTALL CAMSHAFT TIMING OIL CONTROL VALVE ASSEMBLY (EXHAUST CAMSHAFT TIMING GEAR BOLT ASSEMBLY)
| (a) Apply a light coat of engine oil to the O-ring of the camshaft timing oil control valve assembly (exhaust camshaft timing gear bolt assembly). NOTICE: If reusing the camshaft timing oil control valve assembly (exhaust camshaft timing gear bolt assembly), be sure to inspect the O-ring. |
|
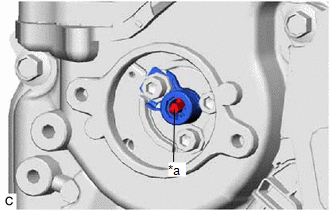
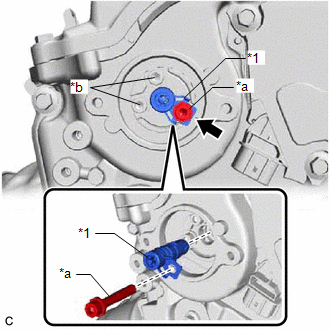
(b) Temporarily install the camshaft timing oil control valve assembly (exhaust camshaft timing gear bolt assembly) to the camshaft timing exhaust gear assembly.
NOTICE:
If the camshaft timing oil control valve assembly (exhaust camshaft timing gear bolt assembly) has been struck or dropped, replace it.
(c) Using a 5 mm hexagon socket wrench, install the camshaft timing oil control valve assembly (exhaust camshaft timing gear bolt assembly) with the bolt.
Torque:
19 N┬Ęm {194 kgf┬Ęcm, 14 ft┬Ęlbf}
2. INSTALL CAM TIMING OIL CONTROL SOLENOID ASSEMBLY
Click here
On-vehicle Inspection
ON-VEHICLE INSPECTION
PROCEDURE
1. REMOVE CAM TIMING OIL CONTROL SOLENOID ASSEMBLY
Click here

2. INSPECT CAMSHAFT TIMING OIL CONTROL VALVE ASSEMBLY (EXHAUST CAMSHAFT TIMING GEAR BOLT ASSEMBLY)
| (a) Check the stroke of the plunger in the center of the camshaft timing oil control valve assembly (exhaust camshaft timing gear bolt assembly). Standard Stroke: 2.2 mm (0.0866 in.) or more If the result is not as specified, replace the camshaft timing oil control valve assembly (exhaust camshaft timing gear bolt assembly). |
|
3. INSTALL CAM TIMING OIL CONTROL SOLENOID ASSEMBLY
Click here
Removal
REMOVAL
CAUTION / NOTICE / HINT
NOTICE:
This procedure includes the removal of small-head bolts. Refer to Small-Head Bolts of Basic Repair Hint to identify the small-head bolts.
Click here

PROCEDURE
1. REMOVE CAM TIMING OIL CONTROL SOLENOID ASSEMBLY
Click here
2. REMOVE CAMSHAFT TIMING OIL CONTROL VALVE ASSEMBLY (EXHAUST CAMSHAFT TIMING GEAR BOLT ASSEMBLY)
| (a) Using a 5 mm hexagon socket wrench, remove the bolt. NOTICE: Do not remove the other 2 bolts. HINT: If it is difficult to loosen the bolt due to the tools contacting the vehicle body or other parts, rotate the crankshaft to move the bolt to a position where it can be removed easily. |
|
(b) Remove the camshaft timing oil control valve assembly (exhaust camshaft timing gear bolt assembly) from the camshaft timing exhaust gear assembly.
Toyota Avalon (XX50) 2019-2022 Service & Repair Manual > Sfi System: Cold Start Idle Control System Performance (P050A00)
MONITOR DESCRIPTION This monitor will run when the engine is started at an engine coolant temperature of -10 to 50┬░C (14 to 122┬░F). The DTC will be stored after the engine idles for 13 seconds (2 trip detection logic). The DTC is designed to monitor the idle air control at cold start. When the eng ...