Components
COMPONENTS
ILLUSTRATION
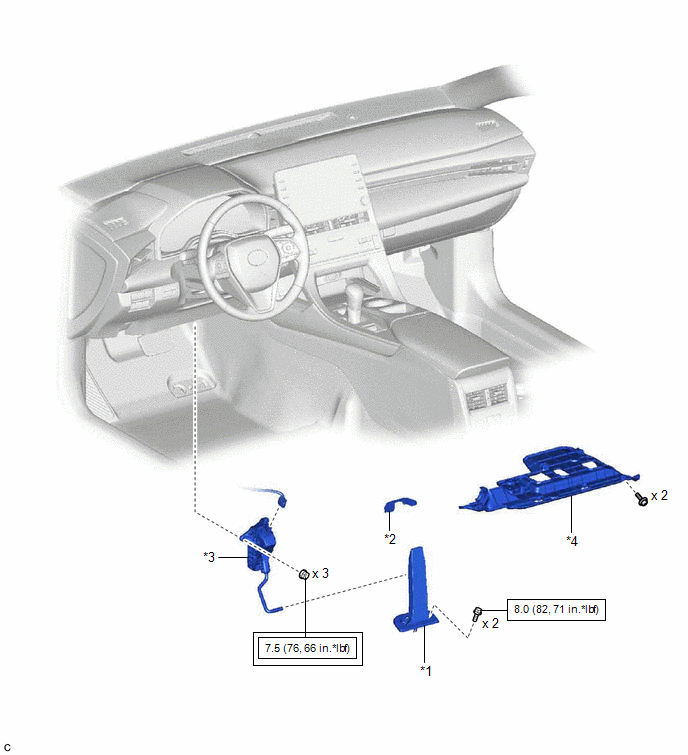
|
*1 | ACCELERATOR PEDAL |
*2 | ACCELERATOR PEDAL PAD |
|
*3 | ACCELERATOR PEDAL SENSOR ASSEMBLY |
*4 | NO. 1 INSTRUMENT PANEL UNDER COVER SUB-ASSEMBLY |
 |
Tightening torque for "Major areas involving basic vehicle performance such as moving/turning/stopping": N*m (kgf*cm, ft.*lbf) |
 |
N*m (kgf*cm, ft.*lbf): Specified torque |
Installation
INSTALLATION
PROCEDURE
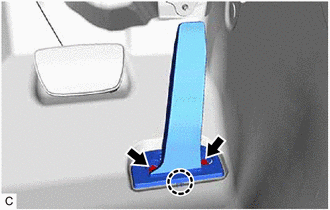
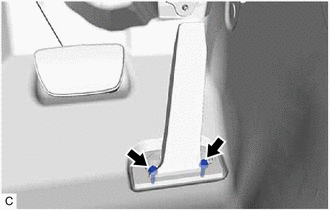
1. INSTALL ACCELERATOR PEDAL
| (a) Engage the claw to install the accelerator pedal. | |
(b) Install the 2 bolts.
Torque:
8.0 N·m {82 kgf·cm, 71 in·lbf}
2. INSTALL ACCELERATOR PEDAL PAD
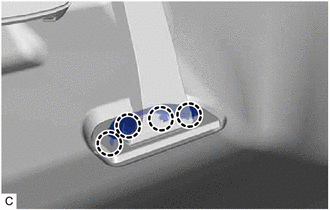
(a) Engage the 4 claws to install the accelerator pedal pad to the accelerator pedal.
3. INSTALL ACCELERATOR PEDAL SENSOR ASSEMBLY
NOTICE:
- Avoid physical shock to the accelerator pedal sensor assembly.
- Do not disassemble the accelerator pedal sensor assembly.
- The accelerator pedal sensor assembly does not require lubrication.
- Do not apply oil or other lubricants to the accelerator pedal sensor
assembly. If applied, the accelerator pedal sensor assembly must be
replaced.
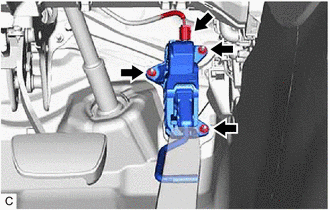
(a) Connect the rod of the accelerator
pedal sensor assembly to the accelerator pedal and install the
accelerator pedal sensor assembly with the 3 nuts.
Torque:
7.5 N·m {76 kgf·cm, 66 in·lbf}
(b) Connect the accelerator pedal sensor assembly connector.
4. INSTALL NO. 1 INSTRUMENT PANEL UNDER COVER SUB-ASSEMBLY
Click here 
On-vehicle Inspection
ON-VEHICLE INSPECTION
PROCEDURE
1. INSPECT ACCELERATOR PEDAL SENSOR ASSEMBLY
(a) Connect the Techstream to the DLC3.
(b) Turn the power switch on (IG).
(c) Turn the Techstream on.
(d)
Enter the following menus: Powertrain / Hybrid Control / Data List /
Accelerator Position Sensor No.1 Voltage %, Accelerator Position Sensor
No.2 Voltage %.
Powertrain > Hybrid Control > Data List
|
Tester Display |
| Accelerator Position Sensor No.1 Voltage % |
|
Accelerator Position Sensor No.2 Voltage % |
(e) Read the Data List.
|
Tester Display | Accelerator Pedal Condition |
Specified Condition |
|
Accelerator Position Sensor No.1 Voltage % |
Not depressed | 10 to 22% |
|
Fully depressed | 52 to 90% |
|
Not depressed → Fully depressed → Not depressed (Accelerator pedal should be operated slowly) |
Value changes progressively |
|
Accelerator Position Sensor No.2 Voltage % |
Not depressed | 24 to 40% |
|
Fully depressed | 68 to 99% |
|
Not depressed → Fully depressed → Not depressed (Accelerator pedal should be operated slowly) |
Value changes progressively |
Removal
REMOVAL
PROCEDURE
1. REMOVE NO. 1 INSTRUMENT PANEL UNDER COVER SUB-ASSEMBLY
Click here 
2. REMOVE ACCELERATOR PEDAL SENSOR ASSEMBLY
NOTICE:
- Avoid physical shock to the accelerator pedal sensor assembly.
- Do not disassemble the accelerator pedal sensor assembly.
- The accelerator pedal sensor assembly does not require lubrication.
- Do not apply oil or other lubricants to the accelerator pedal sensor
assembly. If applied, the accelerator pedal sensor assembly must be
replaced.
| (a) Disconnect the accelerator pedal sensor assembly connector. |
|
(b)
Remove the 3 nuts and disconnect the rod of the accelerator pedal
sensor assembly from the accelerator pedal to remove the accelerator
pedal sensor assembly.
NOTICE:
If the accelerator pedal sensor assembly has been struck or dropped, replace it.
3. REMOVE ACCELERATOR PEDAL PAD
| (a) Disengage the 4 claws and remove the accelerator pedal pad from the accelerator pedal. |
|
4. REMOVE ACCELERATOR PEDAL
(b) Push the accelerator pedal in the direction indicated by the arrow (1) shown in the illustration to disengage the claw.

|
*a | Vehicle Body |
 |
Remove in this Direction (1) |
 |
Remove in this Direction (2) |
(c) Pull the accelerator pedal in the direction indicated by the arrow (2) shown in the illustration to remove it.


