Components
COMPONENTS
ILLUSTRATION
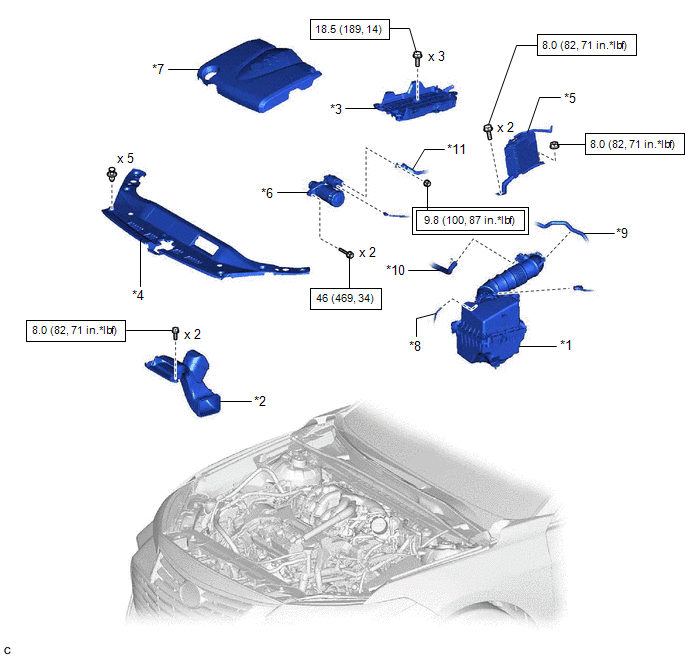
|
*1 | AIR CLEANER ASSEMBLY WITH AIR CLEANER HOSE |
*2 | INLET AIR CLEANER ASSEMBLY |
|
*3 | BATTERY CLAMP SUB-ASSEMBLY |
*4 | COOL AIR INTAKE DUCT SEAL |
|
*5 | ECM |
*6 | STARTER ASSEMBLY |
|
*7 | V-BANK COVER SUB-ASSEMBLY |
*8 | VACUUM HOSE |
|
*9 | NO. 1 FUEL VAPOR FEED HOSE |
*10 | NO. 2 VENTILATION HOSE |
|
*11 | ENGINE WIRE |
- | - |
 |
Tightening torque for "Major areas involving basic vehicle performance such as moving/turning/stopping": N*m (kgf*cm, ft.*lbf) |
 |
N*m (kgf*cm, ft.*lbf): Specified torque |
ILLUSTRATION
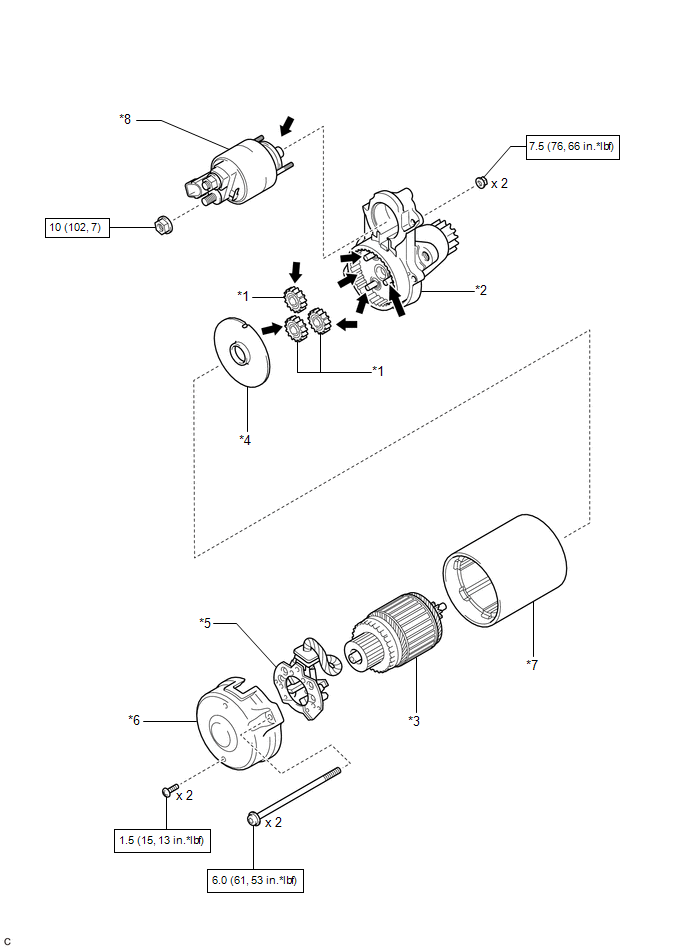
|
*1 | PLANETARY GEAR |
*2 | REPAIR SERVICE STARTER KIT |
|
*3 | STARTER ARMATURE ASSEMBLY |
*4 | STARTER ARMATURE PLATE |
|
*5 | STARTER BRUSH HOLDER ASSEMBLY |
*6 | STARTER COMMUTATOR END FRAME ASSEMBLY |
|
*7 | STARTER YOKE ASSEMBLY |
*8 | MAGNET STARTER SWITCH ASSEMBLY |
 |
N*m (kgf*cm, ft.*lbf): Specified torque |
 |
High-temperature Grease |
Disassembly
DISASSEMBLY
PROCEDURE
1. REMOVE MAGNET STARTER SWITCH ASSEMBLY
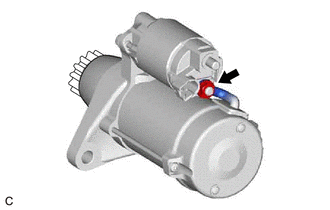
| (a) Remove the nut and disconnect the field coil lead wire from the magnet starter switch assembly. |
|
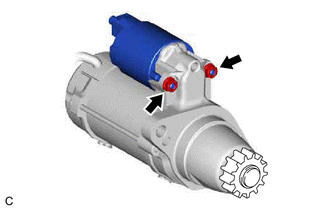
| (b) While holding the magnet starter switch assembly to the repair service starter kit, remove the 2 nuts. |
|
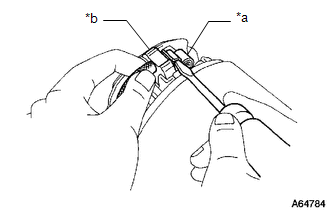
| (c)
While lifting the rear of the magnet starter switch assembly, remove
the hook from the pinion drive lever, then remove the magnet starter
switch assembly. |
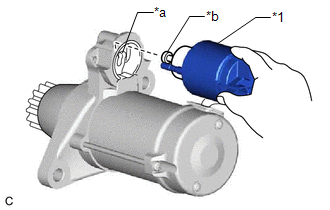 |
|
*1 | Magnet Starter Switch Assembly | |
*a | Pinion Drive Lever | |
*b | Hook | | |
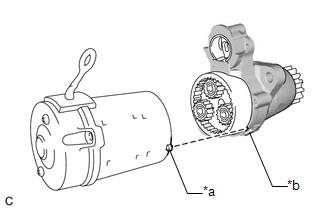
2. REMOVE STARTER YOKE ASSEMBLY
| (a)
Using a T25 "TORX" socket wrench, remove the 2 through bolts and pull
out the starter yoke assembly together with the starter commutator end
frame assembly. |
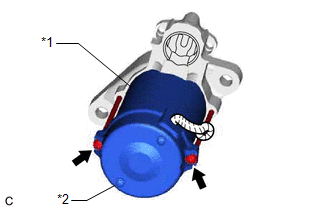 |
|
*1 | Starter Yoke Assembly | |
*2 | Starter Commutator End Frame Assembly | | |
3. REMOVE STARTER COMMUTATOR END FRAME ASSEMBLY
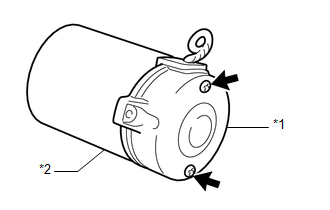
| (a)
Remove the 2 screws and while holding down the field coil lead wire,
remove the starter commutator end frame assembly from the starter yoke
assembly. |
 |
|
*1 | Starter Commutator End Frame Assembly | |
*2 | Starter Yoke Assembly | | |
4. REMOVE STARTER BRUSH HOLDER ASSEMBLY
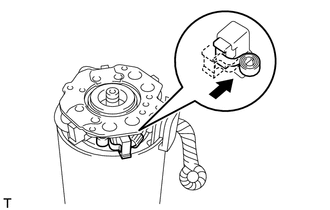
| (a) Using a screwdriver, hold the brush spring back and disconnect the starter brush holder assembly. |
|
(b) Disconnect the 4 brushes, and remove the starter brush holder assembly.
5. REMOVE STARTER ARMATURE ASSEMBLY
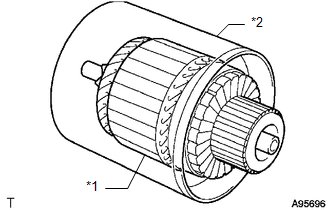
| (a) Remove the starter armature assembly from the starter yoke assembly. |
 |
|
*1 | Starter Armature Assembly | |
*2 | Starter Yoke Assembly | | |
6. REMOVE STARTER ARMATURE PLATE
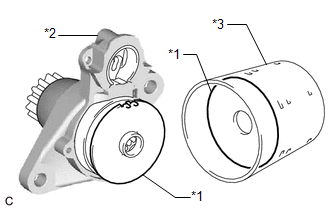
| (a) Remove the starter armature plate from the repair service starter kit or starter yoke assembly. |
 |
|
*1 | Starter Armature Plate | |
*2 | Repair Service Starter Kit | |
*3 | Starter Yoke Assembly | | |
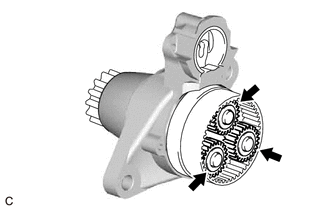
7. REMOVE PLANETARY GEAR
|
(a) Remove the 3 planetary gears from the repair service starter kit. |
|
Inspection
INSPECTION
PROCEDURE
1. INSPECT STARTER ASSEMBLY
CAUTION:
As
a large electric current passes through the cable during this
inspection, a thick cable must be used. If not, the cable may become hot
and cause injury.
NOTICE:
Perform each of the following tests within 3 to 5 seconds to prevent the coil from burning out.
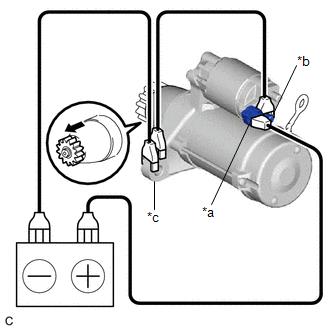
(a) Perform a pull-in test.
(1) Remove the nut, and disconnect the field coil lead wire from terminal C.
(2)
Connect a battery to the magnet starter switch assembly as shown in the
illustration. Check that the clutch pinion gear moves outward.
If the clutch pinion gear does not move outward, replace the magnet starter switch assembly.
|
*a | Terminal 50 |
|
*b | Terminal C |
|
*c | Starter Body |
 |
Moves outward |
(b) Perform a hold-in test.
(1)
While maintaining the battery connections of the pull-in test,
disconnect the negative (-) lead from terminal C. Check that the clutch
pinion gear does not return inward.
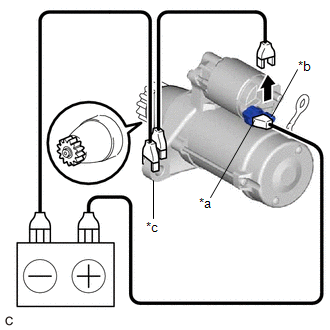
|
*a | Terminal 50 |
|
*b | Terminal C |
|
*c | Starter Body |
 |
Disconnect |
If the clutch pinion gear returns inward, replace the magnet starter switch assembly.
(c) Perform a return test.
(1) Disconnect the negative (-) lead from the starter body. Check that the clutch pinion gear returns inward.
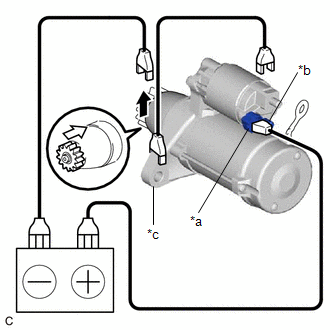
|
*a | Terminal 50 |
|
*b | Terminal C |
|
*c | Starter Body |
 |
Disconnect |
 |
Returns inward |
If the clutch pinion gear does not return inward, replace the magnet starter switch assembly.
(d) Perform a no-load performance test.
(1) Connect the field coil lead wire to terminal C with the nut. Make sure that the field coil lead wire is not grounded.
Torque:
10 N·m {102 kgf·cm, 7 ft·lbf}
(2) Secure the starter assembly in a vise between aluminum plates.
NOTICE:
Ensure that the starter assembly is secured in the vise to prevent it from falling out.
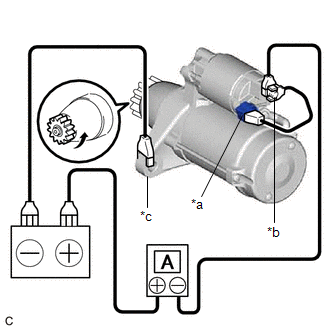
|
*a | Terminal 50 |
|
*b | Terminal 30 |
|
*c | Starter Body |
 |
Rotates |
(3) Connect the battery and an ammeter to the starter assembly as shown in the illustration.
NOTICE:
Do not allow any lead to get caught as the clutch pinion gear operates.
(4) Check that the starter assembly operates smoothly and steadily while the clutch pinion gear is moving outward.
Measure the current according to the value(s) in the table below.
Standard Current:
|
Tester Connection | Condition |
Specified Condition |
|
Battery positive (+) terminal - Terminal 30 - Terminal 50 |
11.5 V | Below 90 A |
If the result is not as specified, replace the starter assembly.
2. INSPECT STARTER ARMATURE ASSEMBLY
HINT:
If there is no continuity between any segments, replace the starter armature assembly.
(a) Check the commutator appearance.
If the surface is dirty or burnt, restore it with sandpaper (400-grit) or on a lathe.
| (b) Check the commutator for an open circuit. (1) Measure the resistance according to the value(s) in the table below.
Standard Resistance: |
Tester Connection | Condition |
Specified Condition | |
Segment - Segment |
Always | Below 1 Ω |
If the result is not as specified, replace the starter armature assembly. |
|
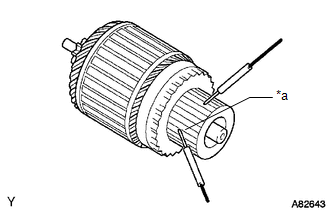
| (c) Check the commutator for a short circuit. (1) Measure the resistance according to the value(s) in the table below.
Standard Resistance: |
Tester Connection | Condition |
Specified Condition | |
Segment - Starter armature core |
Always | 10 kΩ or higher |
If the result is not as specified, replace the starter armature assembly. |
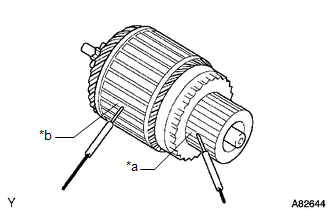 |
|
*a | Segment | |
*b | Starter Armature Core | | |
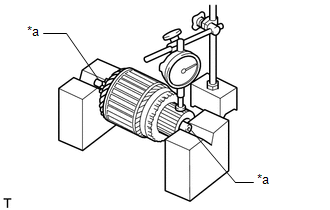
| (d) Check the commutator for runout. (1) Place the armature shaft on V-blocks.
(2) Using a dial indicator, measure the runout. Maximum Runout:
0.05 mm (0.00197 in.) If the runout is greater than the maximum, replace the starter armature assembly. |
|
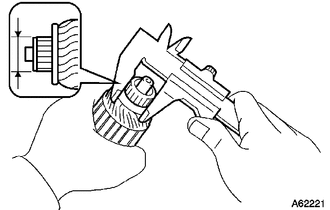
| (e) Using a vernier caliper, measure the commutator diameter.
Standard Diameter: 29 mm (1.14 in.) Minimum Diameter:
28 mm (1.10 in.) If the diameter is less than the minimum, replace the starter armature assembly. |
|
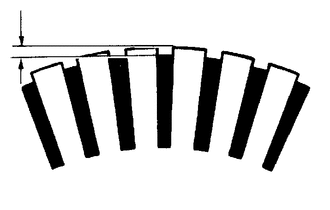
| (f) Check that the undercut portion between the segments is free of foreign matter and measure its depth.
Standard Undercut Depth: 0.7 mm (0.0276 in.) Minimum Undercut Depth:
0.2 mm (0.00787 in.) If the undercut depth is less than the minimum, adjust it with a hacksaw blade. |
|
3. INSPECT STARTER BRUSH HOLDER ASSEMBLY
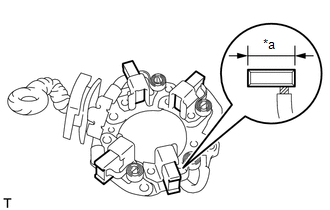
(a) Check the brush length.
| (1) Using a vernier caliper, measure the brush length. Standard Length:
14.4 mm (0.567 in.) Minimum Length: 9.0 mm (0.354 in.)
If the brush length is less than the minimum, replace the starter brush holder assembly. |
|
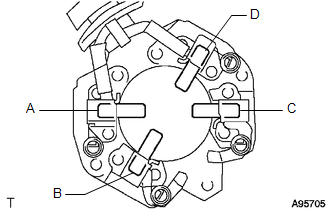
| (b) Check the brush holder resistance. (1) Measure the resistance according to the value(s) in the table below.
Standard Resistance: |
Tester Connection | Condition |
Specified Condition | |
A - B A - C B - D C - D |
Always | 10 kΩ or higher | |
A - D B - C |
Below 1 Ω | If the result is not as specified, replace the starter brush holder assembly. |
|
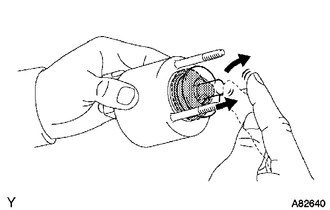
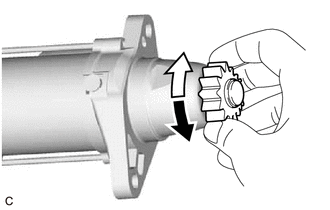
4. INSPECT STARTER CLUTCH
 |
Lock |
 |
Free |
(a) Check the clutch pinion gear.
(1)
Rotate the clutch pinion gear counterclockwise and check that it turns
freely. Try to rotate the clutch pinion gear clockwise and check that it
locks.
If the clutch pinion gear does not operate as specified, replace the repair service starter kit.
5. INSPECT MAGNET STARTER SWITCH ASSEMBLY
| (a) Check the plunger. (1) Push in the plunger and check that it returns quickly to its original position.
If the plunger does not operate as specified, replace the magnet starter switch assembly. |
|
| (b) Check the pull-in coil for an open circuit. (1) Measure the resistance according to the value(s) in the table below.
Standard Resistance: |
Tester Connection | Condition |
Specified Condition | |
Terminal 50 - Terminal C |
Always | Below 1 Ω |
If the result is not as specified, replace the magnet starter switch assembly. |
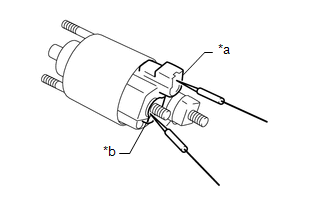 |
|
*a | Terminal 50 | |
*b | Terminal C | | |
| (c) Check the holding coil for an open circuit. (1) Measure the resistance according to the value(s) in the table below.
Standard Resistance: |
Tester Connection | Condition |
Specified Condition | |
Terminal 50 -Magnet starter switch assembly body |
Always | Below 2 Ω |
If the result is not as specified, replace the magnet starter switch assembly. |
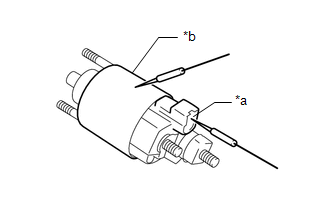 |
|
*a | Terminal 50 | |
*b | Magnet Starter Switch Assembly Body | | |
Installation
INSTALLATION
PROCEDURE
1. INSTALL STARTER ASSEMBLY
(a) Install the starter assembly with the 2 bolts.
Torque:
46 N·m {469 kgf·cm, 34 ft·lbf}
(b) Connect the engine wire to the terminal 30 with the nut.
Torque:
9.8 N·m {100 kgf·cm, 87 in·lbf}
(c) Close the terminal cap.
(d) Connect the starter assembly connector.
2. INSTALL BATTERY CLAMP SUB-ASSEMBLY
Click here

3. INSTALL ECM
Click here

4. INSTALL AIR CLEANER ASSEMBLY WITH AIR CLEANER HOSE
Click here 
5. INSTALL INLET AIR CLEANER ASSEMBLY
Click here 
6. INSTALL V-BANK COVER SUB-ASSEMBLY
Click here 
7. INSTALL COOL AIR INTAKE DUCT SEAL
Click here 
8. INSTALL BATTERY
Click here

Reassembly
REASSEMBLY
PROCEDURE
1. INSTALL PLANETARY GEAR
(a) Apply high-temperature grease to the 3 planetary gears, 3 planetary gear shafts and repair service starter kit.
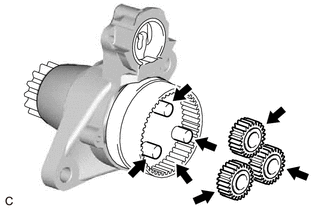
 |
High-temperature Grease |
(b) Install the 3 planetary gears to the repair service starter kit.
2. INSTALL STARTER ARMATURE ASSEMBLY
(a) Install the starter armature assembly to the starter yoke assembly.
NOTICE:
The
magnet of the starter yoke assembly may attract the starter armature
assembly when the starter commutator end frame assembly is installed,
causing the magnet to break.
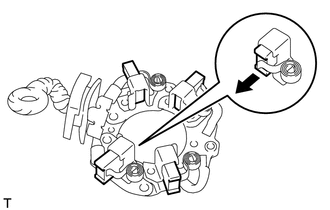
3. INSTALL STARTER BRUSH HOLDER ASSEMBLY
| (a) Hold the brush spring back and set the 4 brushes as shown in the illustration. |
|
| (b)
Install the starter brush holder assembly to the starter armature
assembly and push in the 4 brushes as shown in the illustration. | |
| (c) Fit the protrusion of the grommet between the negative (-) brush holder plate and positive (+) motor lead wire. |
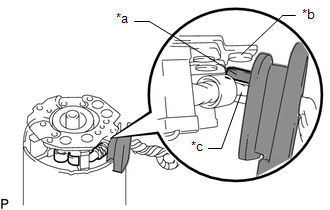 |
|
*a | Grommet | |
*b | Negative (-) Brush Holder Plate | |
*c | Positive (+) Motor Lead Wire | | |
4. INSTALL STARTER COMMUTATOR END FRAME ASSEMBLY
| (a) Install the starter commutator end frame assembly to the starter yoke assembly.
NOTICE: Align the field coil lead wire rubber of the starter yoke assembly with the cutout of the starter commutator end frame assembly. |
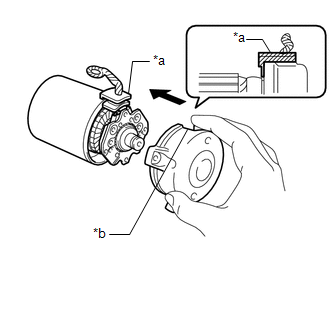 |
|
*a | Field Coil Lead Wire Rubber | |
*b | Cutout | | |
(b) Install the 2 screws.
Torque:
1.5 N·m {15 kgf·cm, 13 in·lbf}
5. INSTALL STARTER ARMATURE PLATE
| (a)
Align the starter armature plate so that the protrusion fits between
the stoppers of the starter yoke assembly, and install the starter
armature plate. NOTICE: Make sure the protrusion of the starter armature plate is inserted between the stoppers of the starter yoke assembly. |
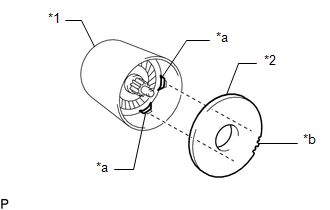 |
|
*1 | Starter Yoke Assembly | |
*2 | Starter Armature Plate | |
*a | Stopper | |
*b | Protrusion | | |
6. INSTALL STARTER YOKE ASSEMBLY
| (a) Align the protrusion of the starter yoke assembly with the cutout of the repair service starter kit. |
|
(b) Using a T25 "TORX" socket wrench, install the starter yoke assembly with the 2 through bolts.
Torque:
6.0 N·m {61 kgf·cm, 53 in·lbf}
7. INSTALL MAGNET STARTER SWITCH ASSEMBLY
(a) Apply high-temperature grease to the plunger as shown in the illustration.
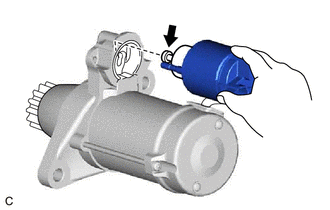
 |
High-temperature Grease |
(b) Hang the hook of the magnet starter switch assembly on the pinion drive lever.
(c) Install the magnet starter switch assembly with the 2 nuts.
Torque:
7.5 N·m {76 kgf·cm, 66 in·lbf}
(d) Connect the field coil lead wire to the magnet starter switch assembly with the nut.
Torque:
10 N·m {102 kgf·cm, 7 ft·lbf}
Removal
REMOVAL
CAUTION / NOTICE / HINT
The
necessary procedures (adjustment, calibration, initialization or
registration) that must be performed after parts are removed and
installed, or replaced starter assembly removal/installation are shown
below.
Necessary Procedures After Parts Removed/Installed/Replaced |
Replaced Part or Performed Procedure |
Necessary Procedure | Effect/Inoperative Function when Necessary Procedure not Performed |
Link |
|
*: When performing learning using the Techstream.
Click here  |
|
Battery terminal is disconnected/reconnected |
Perform steering sensor zero point calibration |
Lane departure alert system (w/ Steering Control) |
 |
|
Pre-collision system |
|
Intelligent clearance sonar system* |
|
Lighting System (for Gasoline Model with Cornering Light) |
|
Memorize steering angle neutral point |
Parking assist monitor system |
 |
|
Panoramic view monitor system |
 |
PROCEDURE
1. PRECAUTION
NOTICE:
After
turning the engine switch off, waiting time may be required before
disconnecting the cable from the negative (-) battery terminal.
Therefore, make sure to read the disconnecting the cable from the
negative (-) battery terminal notices before proceeding with work.
Click here

2. REMOVE BATTERY
Click here

3. REMOVE COOL AIR INTAKE DUCT SEAL
Click here 
4. REMOVE V-BANK COVER SUB-ASSEMBLY
Click here 
5. REMOVE INLET AIR CLEANER ASSEMBLY
Click here 
6. REMOVE AIR CLEANER ASSEMBLY WITH AIR CLEANER HOSE
Click here 
7. REMOVE ECM
Click here

8. REMOVE BATTERY CLAMP SUB-ASSEMBLY
Click here 
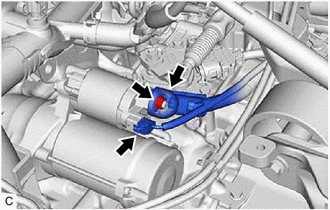
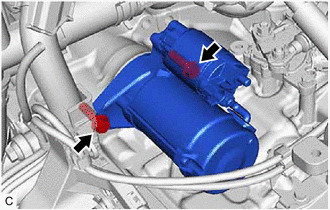
9. REMOVE STARTER ASSEMBLY
| (a) Disconnect the starter assembly connector. | |
(b) Open the terminal cap.
(c) Remove the nut and disconnect the engine wire from the terminal 30.
| (d) Remove the 2 bolts and starter assembly. | |


