Installation
INSTALLATION
PROCEDURE
1. INSTALL KNOCK CONTROL SENSOR
HINT:
Perform "Inspection After Repair" after replacing a knock control sensor.
Click here 
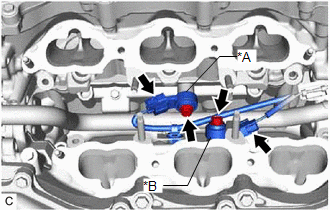
(a)
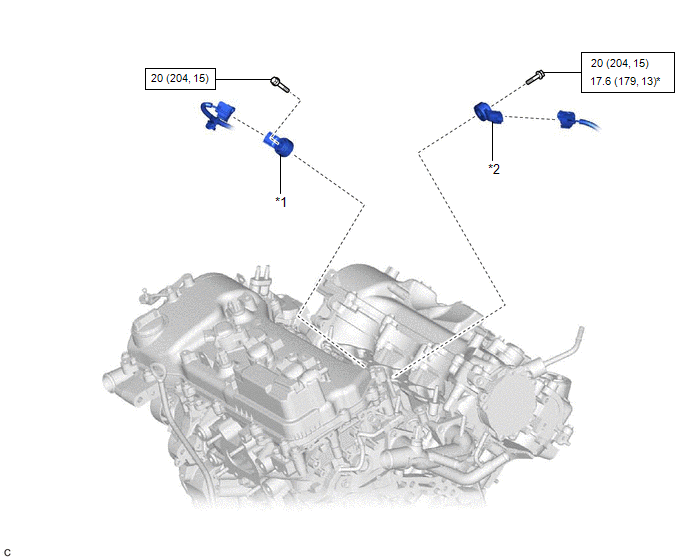
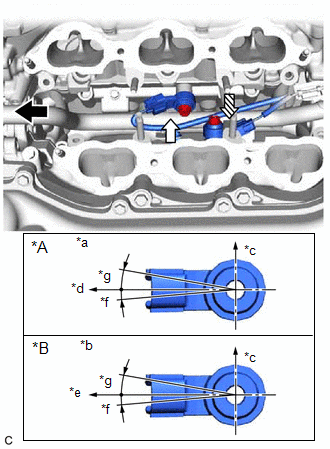
Temporarily install the 2 knock control sensors to the cylinder block
sub-assembly with the 2 bolts so that the knock control sensor
installation position is as shown in the illustration.
|
*A | for Bank 1 |
|
*B | for Bank 2 |
|
*a | View A |
|
*b | View B |
|
*c | Top |
|
*d | Engine Front |
|
*e | Engine Rear |
|
*f | 5° |
|
*g | 10° |
 |
Engine Front |
 |
View A |
 |
View B |
NOTICE:
- If a knock control sensor has been struck or dropped, replace it.
- Make sure that the knock control sensor is installed in the correct position.
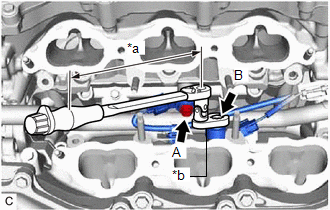
| (b) Tighten the bolt (A).
Torque: 20 N·m {204 kgf·cm, 15 ft·lbf} |
 |
|
*a | Torque Wrench Fulcrum Length | |
*b | 10 mm Union Nut Wrench | | |
(c) Using a 10 mm union nut wrench, tighten the bolt (B).
Torque:
Specified tightening torque :
20 N·m {204 kgf·cm, 15 ft·lbf}
HINT:
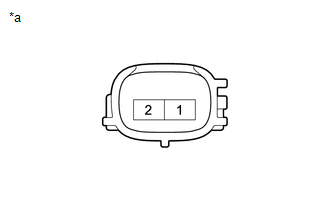
(d) Connect the 2 knock control sensor connectors.
2. INSTALL FUEL DELIVERY PIPE
Click here
3. PERFORM INITIALIZATION
(a) Perform "Inspection After Repair" after replacing a knock control sensor.
Click here
Removal
REMOVAL
CAUTION / NOTICE / HINT
The
necessary procedures (adjustment, calibration, initialization or
registration) that must be performed after parts are removed and
installed, or replaced during knock control sensor removal/installation
are shown below.
Necessary Procedures After Parts Removed/Installed/Replaced |
Replaced Part or Performed Procedure |
Necessary Procedure | Effect/Inoperative Function when Necessary Procedure not Performed |
Link |
|
*: When performing learning using the Techstream.
Click here  |
|
Battery terminal is disconnected/reconnected |
Perform steering sensor zero point calibration |
Lane Departure Alert System (w/ Steering Control) |
|
|
Pre-collision System |
|
Intelligent Clearance Sonar System* |
|
Lighting System (for Gasoline Model with Cornering Light) |
|
Memorize steering angle neutral point |
Parking Assist Monitor System |
|
|
Panoramic View Monitor System |
|
- Replacement of fuel injector assembly (for Port Injection)
- Replacement of fuel injector assembly (for Direct Injection)
- Replacement of throttle body with motor assembly
- Cleaning the deposits from the throttle body with motor assembly
- Replacement of knock control sensor
| Inspection after repair |
- Poor idle, etc.
- Engine start function, etc.
|
|
PROCEDURE
1. REMOVE FUEL DELIVERY PIPE
Click here
2. REMOVE KNOCK CONTROL SENSOR
| (a) Disconnect the 2 knock control sensor connectors. |
 |
|
*A | for Bank 1 | |
*B | for Bank 2 | | |
(b) Remove the 2 bolts and 2 knock control sensors from the cylinder block sub-assembly.
NOTICE:
If a knock control sensor has been struck or dropped, replace it.