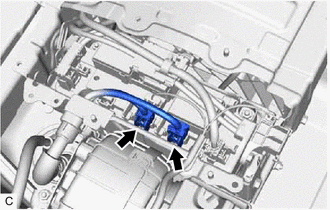
Hybrid/EV Battery Current Sensor for Driving Control Circuit Short to Ground (P1C9F11,P1C9F15)
DESCRIPTION
Refer to the description for DTC P0ABF11.
Click here 
|
DTC No. | Detection Item |
DTC Detection Condition | Trouble Area |
MIL | Warning Indicate |
|
P1C9F11 | Hybrid/EV Battery Current Sensor for Driving Control Circuit Short to Ground |
Value of "Hybrid Battery Current for Driving Control" (IBA) is excessively low.
(1 trip detection logic) |
Battery voltage sensor |
Comes on | Master Warning Light:
Comes on |
| P1C9F15 |
Hybrid/EV Battery Current Sensor for Driving Control Circuit Short to Auxiliary Battery or Open |
Value of "Hybrid Battery Current for Driving Control" (IBA) is excessively high.
(1 trip detection logic) |
Battery voltage sensor |
Comes on | Master Warning Light:
Comes on |
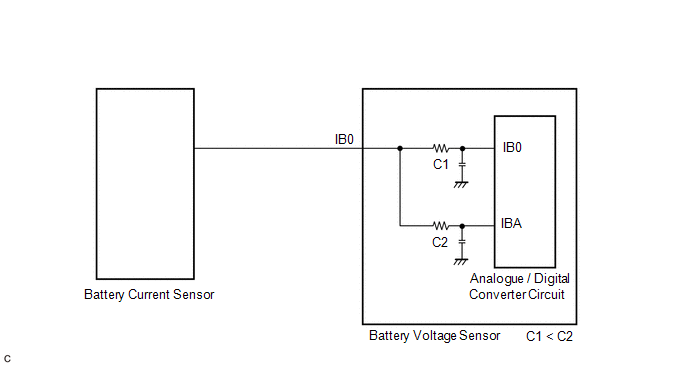
IB0
is used for battery control and IBA is used for driving control.
Although IB0 and IBA receive voltage output by the battery current
sensor through the same terminal, their output may differ as they are
connected through separate filter circuits within the battery voltage
sensor.
 Related Data List
 |
DTC No. | Data List |
|
P1C9F11 |
- Hybrid Battery Current for Hybrid Battery Control
- Hybrid Battery Current for Driving Control
|
| P1C9F15 |
MONITOR DESCRIPTION
If
the value of Data List item Hybrid Battery Current for Driving Control
(IBA) is abnormal, the hybrid vehicle control ECU will illuminate the
MIL and store a DTC.
MONITOR STRATEGY
|
Related DTCs | P1CA1 (INF P1C9F11): Hybrid/EV battery pack current sensor circuit malfunction (+B short)
P1CA2 (INF P1C9F15): Hybrid/EV battery pack current sensor circuit malfunction (GND short) |
|
Required sensors/components | Battery current sensor |
|
Frequency of operation | Continuous |
|
Duration | TMC's intellectual property |
|
MIL operation | Immediately |
|
Sequence of operation | None |
TYPICAL ENABLING CONDITIONS
|
The monitor will run whenever the following DTCs are not stored |
TMC's intellectual property |
| Other conditions belong to TMC's intellectual property |
- |
TYPICAL MALFUNCTION THRESHOLDS
|
TMC's intellectual property | - |
COMPONENT OPERATING RANGE
|
Battery voltage sensor | DTC P1CA1 (INF P1C9F11) is not detected
DTC P1CA2 (INF P1C9F15) is not detected |
CONFIRMATION DRIVING PATTERN
HINT:
- After repair has been completed, clear the DTC and then check that the
vehicle has returned to normal by performing the following All Readiness
check procedure.
Click here 
- When clearing the permanent DTCs, refer to the "CLEAR PERMANENT DTC" procedure.
Click here 
- Connect the Techstream to the DLC3.
- Turn the power switch on (IG) and turn the Techstream on.
- Clear the DTCs (even if no DTCs are stored, perform the clear DTC procedure).
- Turn the power switch off and wait for 2 minutes or more.
- Turn the power switch on (IG) and turn the Techstream on.
- With power switch on (IG) and wait for 10 seconds or more.[*1]
HINT:
[*1]: Normal judgment procedure.
The normal judgment procedure is used to complete DTC judgment and also used when clearing permanent DTCs.
- Enter the following menus: Powertrain / Hybrid Control / Utility / All Readiness.
- Check the DTC judgment result.
HINT:
- If the judgment result shows NORMAL, the system is normal.
- If the judgment result shows ABNORMAL, the system has a malfunction.
- If the judgment result shows INCOMPLETE or N/A, perform the normal judgment procedure again.
PROCEDURE
|
1. | CHECK DTC OUTPUT (HYBRID CONTROL) |
(a) Connect the Techstream to the DLC3.
(b) Turn the power switch on (IG).
(c) Enter the following menus: Powertrain / Hybrid Control / Trouble Codes.
(d) Check and record any HV system DTCs and freeze frame data.
Powertrain > Hybrid Control > Trouble Codes
|
Result | Proceed to |
|
P0AFC00, P0AFC96, P308A12, P0ABF11, P0ABF15, P0ABF28 or P0ABF2A is not output. |
A |
| P0AFC00, P0AFC96, P308A12, P0ABF11, P0ABF15, P0ABF28 or P0ABF2A is output. |
B |
(e) Turn the power switch off.
| A |
 | REPLACE BATTERY VOLTAGE SENSOR |
| B |
 | GO TO DTC CHART (HYBRID CONTROL SYSTEM) |
Engine Failed to Start Mechanical Linkage Failure (P1C7779)
DTC SUMMARY
MALFUNCTION DESCRIPTION
This
DTC is stored when the hybrid vehicle control ECU determines that the
hybrid transaxle assembly has seized or that there is the hybrid
transaxle assembly malfunction in the drivetrain. The cause of this
malfunction may be one of the following:
Engine malfunction
- Seizure due to insufficient engine oil
- Seizure due to insufficient coolant
- Damaged engine
Hybrid transaxle malfunction
- Seizure due to insufficient ATF
- Damaged hybrid transaxle internal components
- Damaged transmission input damper assembly
DESCRIPTION
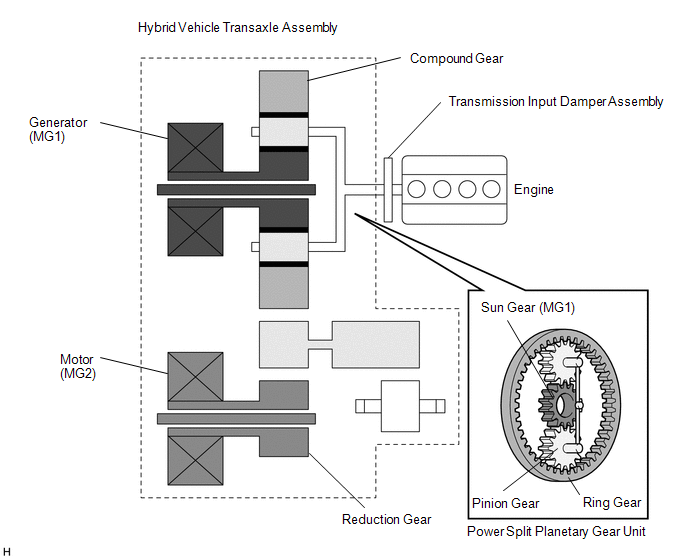
The
hybrid vehicle transaxle assembly consists of the planetary gear unit,
generator (MG1) and motor (MG2). The planetary gear unit uses a
planetary gear to split the engine output into mechanical power and
electrical power in accordance with driving requests when the vehicle is
being driven or the HV battery is being charged. When accelerating,
motor (MG2) assists engine output by increasing vehicle driving force.
Motor (MG2) also converts braking energy, which would otherwise be
consumed in the form of heat during braking, into electrical energy.
This recovered energy is stored in the HV battery. Generator (MG1)
supplies power, which is used for charging the HV battery or driving
motor (MG2), and also regulates the amount of electricity being
generated. In addition, generator (MG1) is used as a starter motor to
start the engine.
If the hybrid vehicle control
ECU detects that the engine or transaxle gear has seized, the hybrid
vehicle control ECU will perform fail-safe control. Also, if a substance
or object is preventing the engine or transaxle internal components
from rotating, the hybrid vehicle control ECU will perform fail-safe
control.
|
DTC No. | Detection Item |
DTC Detection Condition | Trouble Area |
MIL | Warning Indicate |
|
P1C7779 | Engine Failed to Start Mechanical Linkage Failure |
The engine does not start even though it is being cranked (transaxle input circuit malfunction (engine system))
(1 trip detection logic) |
- Hybrid vehicle transaxle assembly
- Transmission input damper assembly
- Engine
| Does not come on |
Master Warning Light: Comes on |
Related Data List |
DTC No. | Data List |
|
P1C7779 |
- Engine Speed
- Generator Revolution
- Motor Revolution
- Target Generator Torque
- Generator Torque
|
CONFIRMATION DRIVING PATTERN
HINT:
After
repair has been completed, clear the DTCs and then check that the
vehicle has returned to normal by performing the following All Readiness
check procedure.
Click here 
- Connect the Techstream to the DLC3.
- Turn the power switch on (IG) and turn the Techstream on.
- Clear the DTCs (even if no DTCs are stored, perform the clear DTC procedure).
- Turn the power switch off and wait for 2 minutes or more.
- Turn the power switch on (IG) and turn the Techstream on.
- Turn the power switch on (READY).
- While driving the vehicle at a speed of 20 km/h (12 mph) or more in EV
mode, depress the accelerator pedal to start the engine, and drive the
vehicle for 3 seconds or more.*1
*1: When the HV system is normal, the engine starts
when the accelerator pedal is depressed halfway or more. If the HV
system is malfunctioning, the engine may not start. Even in this case,
drive the vehicle at a speed of 20 km/h (12 mph) or more in EV mode for 3
seconds or more.
- Enter the following menus: Powertrain / Hybrid Control / Utility / All Readiness.
- Check the DTC judgment result.
HINT:
- If the judgment result shows NORMAL, the system is normal.
- If the judgment result shows ABNORMAL, the system has a malfunction.
- If the judgment result shows INCOMPLETE or N/A, perform driving pattern again.
CAUTION / NOTICE / HINT
HINT:
If
this DTC is output, the engine or gears in the transaxle may have
seized. Before performing this inspection, check the engine oil, hybrid
transaxle fluid, coolant (for Engine) and coolant (for Inverter) levels.
PROCEDURE
| 1. |
CHECK CRANKSHAFT PULLEY REVOLUTION (P POSITION) |
(a) Make sure that the shift lever is in P position.
(b) Lift up the vehicle.
(c) Turn the crankshaft pulley using hand tools to check if the crankshaft can rotate smoothly.
CAUTION:
Do
not turn the power switch on (READY) while performing this inspection.
Be sure to turn the power switch off before performing this inspection,
to prevent the engine from starting.
NOTICE:
Engine
compression causes resistance when turning the crankshaft pulley. Check
if the crankshaft rotates smoothly (or if it is locked) by manually
applying sufficient torque to turn the crankshaft pulley. The torque
required to turn the crankshaft pulley should be the same as for a known
good vehicle of the same type.
OK:
The crankshaft rotates smoothly.
(d) Lower the vehicle.
| NG |  |
GO TO STEP 6 |
|
OK |
 | |
(a) Connect the Techstream to the DLC3.
(b) Turn the power switch on (IG).
(c) Clear the DTCs.
Powertrain > Hybrid Control > Clear DTCs Powertrain > Engine > Clear DTCs
(d) Turn the power switch off.
|
NEXT |
 | |
(a) Connect the Techstream to the DLC3.
(b) Turn the power switch on (READY).
(c) Enter the following menus: Powertrain / Hybrid Control / Data List / Engine Speed, Generator Revolution.
Powertrain > Hybrid Control > Data List
|
Tester Display |
| Engine Speed |
|
Generator Revolution |
(d) Read the Data List.
| (1) While the READY indicator is on, depress the accelerator pedal for 10 seconds.
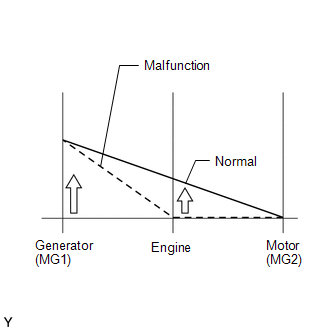
OK: "Generator Revolution" is approximately 3.6 times "Engine Speed".
HINT:
- If the engine does not race and DTC P314779 (Transmission system) is
output or generator (MG1) operates but the engine does not crank,
replace the hybrid vehicle transaxle assembly.
- Refer to the graph for Data List confirmation of "Generator Revolution" and "Engine Speed".
|
Data List | Engine Speed |
Generator Revolution | |
Reference Value | Approximately 1000 rpm |
Approximately 3600 rpm | |
Approximately 1500 rpm |
Approximately 5400 rpm | |
Approximately 2500 rpm |
Approximately 9000 rpm | |
|
(e) Turn the power switch off.
| NG |  |
REPLACE HYBRID VEHICLE TRANSAXLE ASSEMBLY |
|
OK |
 | |
(a) Turn the power switch on (READY).
(b) Depress the brake pedal, move the shift lever to D, and release the brake pedal.
OK:
The wheels turn (the vehicle creeps forward).
(c) Turn the power switch off.
| NG |
 | REPLACE HYBRID VEHICLE TRANSAXLE ASSEMBLY |
|
OK |
 | |
(a) Connect the Techstream to the DLC3.
(b) Turn the power switch on (READY).
(c) Enter the following menus: Powertrain / Hybrid Control / Data List / Engine Speed, Generator Revolution, Motor Revolution.
Powertrain > Hybrid Control > Data List
|
Tester Display |
| Engine Speed |
|
Generator Revolution |
|
Motor Revolution |
(d) Read the Data List.
(1) Move the shift lever to D.
(2) Fully depress the accelerator pedal when the vehicle speed is 10 km/h (6 mph) or more.
NOTICE:
Perform this test only in an appropriate safe location, in accordance with all local laws.
(3)
Calculate the difference between the value of "Engine Speed" and "(0.28
x Generator Revolution) + (0.19 x Motor Revolution)".
|
Result | Proceed to |
|
The absolute value of the difference is less than 500 rpm. |
A |
| The absolute value of the difference is 500 rpm or more continuously for 1 second. |
B |
(e) Turn the power switch off.
| A |
 | REPLACE HYBRID VEHICLE TRANSAXLE ASSEMBLY |
| B |
 | REPLACE TRANSMISSION INPUT DAMPER ASSEMBLY |
| 6. |
CHECK CRANKSHAFT PULLEY REVOLUTION (N POSITION) |
(a) Lift up the vehicle.
(b) Move the shift lever to N.
(c) Turn the crankshaft pulley using hand tools to check if the crankshaft can rotate smoothly.
CAUTION:
Do
not turn the power switch on (READY) while performing this inspection.
Be sure to turn the power switch off before performing this inspection,
to prevent the engine from starting.
NOTICE:
Engine
compression causes resistance when turning the crankshaft pulley. Check
if the crankshaft rotates smoothly (or if it is locked) by manually
applying sufficient torque to turn the crankshaft pulley. The torque
required to turn the crankshaft pulley should be the same as for a known
good vehicle of the same type.
OK:
The crankshaft rotates smoothly.
(d) Move the shift lever to P.
(e) Lower the vehicle.
| OK |
 | REPLACE HYBRID VEHICLE TRANSAXLE ASSEMBLY |
| NG |
 | REPAIR OR REPLACE ENGINE |
High Voltage Power Resource Circuit Consumption Circuit Short (P1C8149,P1C8249)
DTC SUMMARY
MALFUNCTION DESCRIPTION
The
hybrid vehicle control ECU monitors the high-voltage wiring between the
HV battery and inverter with converter assembly and detects a short
circuit malfunction or high-voltage system operation malfunction.
The cause of this malfunction may be one of the following:
Battery current sensor (IB) circuit malfunction
- Battery current sensor (IB) malfunction
- Motor generator control ECU (MG ECU) malfunction
- Communication (wire harness) malfunction
High voltage system malfunction
- HV battery malfunction
- HV battery junction block assembly malfunction
- Inverter with converter assembly malfunction
- Air conditioner system malfunction
- High-voltage wire harness malfunction
- High-voltage connector or connection malfunction
Low-voltage circuit (12 V) malfunction
- Hybrid vehicle control ECU malfunction
- Low voltage wire harness malfunction
- Low voltage connector malfunction
INSPECTION DESCRIPTION
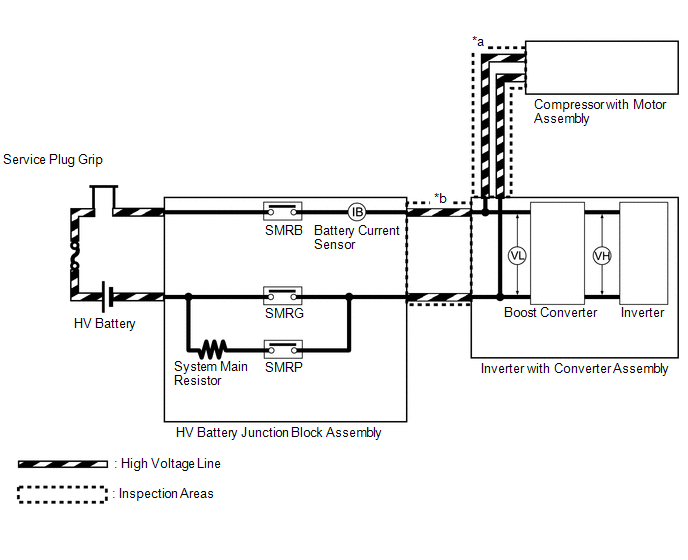
|
System Diagram Location | Inspection Content |
Reason | Inspection Step |
|
*a | Check high-voltage wiring connection condition of the air conditioner compressor with motor assembly |
Check for short circuit |
2, 4 |
| *b |
Check the high voltage cables between the HV battery junction block assembly and inverter with converter assembly. |
Check for short circuit |
3, 5 |
DESCRIPTION
Refer to the description for DTC P0AE411.
Click here

|
DTC No. | Detection Item |
DTC Detection Condition | Trouble Area |
MIL | Warning Indicate |
|
P1C8149 | High Voltage Power Resource Circuit Consumption Circuit Short |
High-voltage circuit malfunctions between the HV battery and inverter with converter assembly.
Excessive overcurrent equal to a short occurs during precharge (time from when SMRP turns on until SMRG turns on).
(1 trip detection logic) |
- Air conditioning wire
- Compressor with motor assembly
- Inverter with converter assembly
- HV battery junction block assembly
- HV floor under wire
| Does not come on |
Master Warning Light: Comes on |
|
P1C8249 | High Voltage Power Resource Circuit Over Loading |
High-voltage circuit malfunctions between the HV battery and inverter with converter assembly.
Small
battery overcurrent occurs during precharge (time from when SMRP turns
on until SMRG turns on) and current continues to flow after precharge. (1 trip detection logic) |
- Air conditioning wire
- Compressor with motor assembly
- Inverter with converter assembly
- HV battery junction block assembly
- HV floor under wire
| Does not come on |
Master Warning Light: Comes on |
Related Data List |
DTC No. | Data List |
|
P1C8149 |
- Hybrid Battery Voltage
- Hybrid Battery Current
- VL-Voltage before Boosting
- VH-Voltage after Boosting
|
| P1C8249 |
CONFIRMATION DRIVING PATTERN
HINT:
After
repair has been completed, clear the DTC and then check that the
vehicle has returned to normal by performing the following All Readiness
check procedure.
Click here 
- Connect the Techstream to the DLC3.
- Turn the power switch on (IG) and turn the Techstream on.
- Clear the DTCs (even if no DTCs are stored, perform the clear DTC procedure).
- Turn the power switch off and wait for 2 minutes or more.
- Turn the power switch on (READY) and wait for 30 seconds or more.
- Turn the power switch off and wait for 2 minutes or more.
- Turn the power switch on (IG) and turn the Techstream on.
- Enter the following menus: Powertrain / Hybrid Control / Utility / All Readiness.
- Check the DTC judgment result.
HINT:
- If the judgment result shows NORMAL, the system is normal.
- If the judgment result shows ABNORMAL, the system has a malfunction.
- If the judgment result shows INCOMPLETE or N/A, perform driving pattern again.
WIRING DIAGRAM
Refer to the wiring diagram for DTC P0AA649.
Click here 
CAUTION / NOTICE / HINT
CAUTION:
NOTICE:
After
turning the power switch off, waiting time may be required before
disconnecting the cable from the negative (-) auxiliary battery
terminal. Therefore, make sure to read the disconnecting the cable from
the negative (-) auxiliary battery terminal notices before proceeding
with work.
Click here 
PROCEDURE
| 1. |
CHECK DTC OUTPUT (HYBRID CONTROL, MOTOR GENERATOR) |
(a) Connect the Techstream to the DLC3.
(b) Turn the power switch on (IG).
(c) Enter the following menus: Powertrain / Hybrid Control and Motor Generator / Trouble Codes.
(d) Check for DTCs.
Powertrain > Hybrid Control > Trouble Codes Powertrain > Motor Generator > Trouble Codes
|
Result | Proceed to |
|
P1C8149 or P1C8249 only is output, or DTCs except the ones in the tables below are also output. |
A |
| DTCs of hybrid control system in the tables below are output. |
B |
| DTCs of motor generator control system in the tables below are output. |
C |
|
Malfunction Content | System |
Relevant DTC |
|
Microcomputer malfunction |
Hybrid control system | P060647 |
Hybrid/EV Powertrain Control Module Processor Watchdog / Safety MCU Failure |
|
P0AFC96 | Hybrid/EV Battery Sensor Module Component Internal Failure |
|
P0AFC00 | Hybrid/EV Battery Sensor Module |
|
Power source circuit malfunction | Hybrid control system |
P0AFC16 | Hybrid/EV Battery Sensor Module Circuit Voltage Below Threshold |
|
Communication system malfunction | Hybrid control system |
U029A87 | Lost Communication with Hybrid/EV Battery Sensor Module Missing Message |
|
Sensor and actuator circuit malfunction |
Hybrid control system | P0ABF11 |
Hybrid/EV Battery Current Sensor "A" Circuit Short to Ground |
|
P0ABF15 | Hybrid/EV Battery Current Sensor "A" Circuit Short to Auxiliary Battery or Open |
|
P0B3B14 | Hybrid/EV Battery Voltage Sensor "A" Circuit Short to Ground or Open |
|
P0B4014 | Hybrid/EV Battery Voltage Sensor "B" Circuit Short to Ground or Open |
|
P0B4514 | Hybrid/EV Battery Voltage Sensor "C" Circuit Short to Ground or Open |
|
P0B4A14 | Hybrid/EV Battery Voltage Sensor "D" Circuit Short to Ground or Open |
|
P0B4F14 | Hybrid/EV Battery Voltage Sensor "E" Circuit Short to Ground or Open |
|
P0B5414 | Hybrid/EV Battery Voltage Sensor "F" Circuit Short to Ground or Open |
|
P0B5914 | Hybrid/EV Battery Voltage Sensor "G" Circuit Short to Ground or Open |
|
P0B5E14 | Hybrid/EV Battery Voltage Sensor "H" Circuit Short to Ground or Open |
|
P0B6314 | Hybrid/EV Battery Voltage Sensor "I" Circuit Short to Ground or Open |
|
P0B6814 | Hybrid/EV Battery Voltage Sensor "J" Circuit Short to Ground or Open |
|
P0B6D14 | Hybrid/EV Battery Voltage Sensor "K" Circuit Short to Ground or Open |
|
P0B7214 | Hybrid/EV Battery Voltage Sensor "L" Circuit Short to Ground or Open |
|
P308A13 | Hybrid/EV Battery Voltage Sensor All Circuit Open |
|
P0AFC62 | Hybrid/EV Battery Sensor Module Signal Compare Failure |
|
P0B231C | Hybrid/EV Battery "A" Voltage Sensor Voltage Out of Range |
|
P308A12 | Hybrid/EV Battery Voltage Sensor All Circuit Short to Auxiliary Battery |
|
P0ABF00 | Hybrid/EV Battery Current Sensor "A" Circuit Range/Performance |
|
P0ABF28 | Hybrid/EV Battery Current Sensor "A" Signal Bias Level Out of Range / Zero Adjustment Failure |
|
P0ABF2A | Hybrid/EV Battery Current Sensor "A" Signal Stuck In Range |
|
Motor generator control system | P0A1114 |
DC/DC Converter Enable Circuit Short to Ground or Open |
|
P0A1112 | DC/DC Converter Enable Circuit Short to Battery |
|
P1CCC96 | DC/DC Converter Enable Component Internal Failure |
|
System malfunction | Motor generator control system |
P0D3319 | DC/DC Converter Circuit Current Above Threshold |
HINT:
- P1C8149 or P1C8249 may be output as a result of the malfunction indicated by the DTCs above.
- The chart above is listed in inspection order of priority.
- Check DTCs that are output at the same time by following the listed
order. (The main cause of the malfunction can be determined without
performing unnecessary inspections.)
(e) Turn the power switch off.
| B |
 | GO TO DTC CHART (HYBRID CONTROL SYSTEM) |
| C |
 | GO TO DTC CHART (MOTOR GENERATOR CONTROL SYSTEM) |
|
A |
 | |
| 2. |
CHECK COMPRESSOR WITH MOTOR ASSEMBLY |
CAUTION:
Be sure to wear insulated gloves.
(a) Check that the service plug grip is not installed.
NOTICE:
After
removing the service plug grip, do not turn the power switch on
(READY), unless instructed by the repair manual because this may cause a
malfunction.
| (b) Disconnect the air conditioning wire connector from the inverter with converter assembly. |
|
| (c) Measure the resistance according to the value(s) in the table below.
Standard Resistance: |
Tester Connection (Tester Probe Polarity) |
Condition | Specified Condition | |
T2-2 (ACPE) (Negative (-) probe) - T2-1 (ACPB) (Positive (+) probe) |
Power switch off |
100 kΩ or higher |
NOTICE:
- Do not use a megohmmeter.
- Read the resistance after the value has stabilized.
- Be sure to inspect with connecting the tester probes to the tips of the terminal.
|
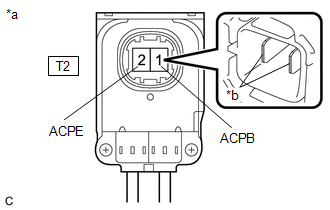 |
|
*a | Air conditioning wire
(Inverter with Converter Assembly Side) | |
*b | Tip of Terminal | | |
(d) Reconnect the air conditioning wire connector.
| NG |
 | GO TO STEP 4 |
|
OK |
 | |
| 3. |
CHECK HV FLOOR UNDER WIRE |
CAUTION:
Be sure to wear insulated gloves.
(a) Check that the service plug grip is not installed.
NOTICE:
After
removing the service plug grip, do not turn the power switch on
(READY), unless instructed by the repair manual because this may cause a
malfunction.
| (b) Disconnect the HV floor under wire connector from the inverter with converter assembly. |
|
| (c) Measure the resistance according to the value(s) in the table below.
Standard Resistance: |
Tester Connection | Condition |
Specified Condition | |
S1-1 (CBI) - S1-2 (CEI) |
Power switch off |
10 kΩ or higher | NOTICE:
Be sure not to damage or deform the terminal being inspected. |
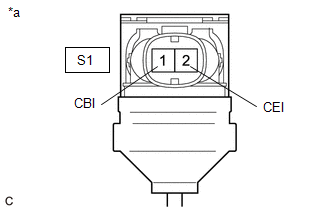 |
|
*a | HV Floor Under Wire
(Inverter with Converter Assembly Side) | | |
(d) Reconnect the HV floor under wire connector.
| OK |
 | REPLACE INVERTER WITH CONVERTER ASSEMBLY |
| NG |
 | GO TO STEP 5 |
| 4. |
CHECK HV AIR CONDITIONING WIRE |
CAUTION:
Be sure to wear insulated gloves.
(a) Check that the service plug grip is not installed.
NOTICE:
After
removing the service plug grip, do not turn the power switch on
(READY), unless instructed by the repair manual because this may cause a
malfunction.
| (b) Disconnect the HV air conditioning wire connector from the inverter with converter assembly. |
|
| (c) Disconnect the HV air conditioning wire from the compressor with motor assembly.
Click here  | |
| (d) Measure the resistance according to the value(s) in the table below.
Standard Resistance: |
Tester Connection | Condition |
Specified Condition | |
T2-2 (ACPE) - T2-1 (ACPB) |
Power switch off |
10 kΩ or higher | NOTICE:
Be sure to inspect with connecting the tester probes to the tips of the terminal. |
 |
|
*a | HV air conditioning wire
(Inverter with Converter Assembly Side) | |
*b | Tip of Terminal | | |
(e) Reconnect the HV air conditioning wire connector to the inverter with converter assembly.
(f) Reconnect the HV air conditioning wire to the compressor with motor assembly.
| OK |
 | REPLACE COMPRESSOR WITH MOTOR ASSEMBLY |
| NG |
 | REPLACE HV AIR CONDITIONING WIRE |
| 5. |
CHECK HV FLOOR UNDER WIRE |
CAUTION:
Be sure to wear insulated gloves.
(a) Check that the service plug grip is not installed.
NOTICE:
After
removing the service plug grip, do not turn the power switch on
(READY), unless instructed by the repair manual because this may cause a
malfunction.
(b) Remove the No. 1 HV battery cover panel RH.
Click here

| (c) Disconnect the HV floor under wire connectors from the HV battery junction block assembly. |
|
| (d) Disconnect the HV floor under wire connector from the inverter with converter assembly. |
|
| (e) Measure the resistance according to the value(s) in the table below.
Standard Resistance: |
Tester Connection | Condition |
Specified Condition | |
S1-1 (CBI) - S1-2 (CEI) |
Power switch off |
10 kΩ or higher | NOTICE:
Be sure not to damage or deform the terminal being inspected. |
 |
|
*a | HV Floor Under Wire
(Inverter with Converter Assembly Side) | | |
(f) Reconnect the HV floor under wire connector to the inverter with converter assembly.
(g) Reconnect the HV floor under wire connectors to the HV battery junction block assembly.
(h) Install the No. 1 HV battery cover panel RH.
| OK |
 | REPLACE HV BATTERY JUNCTION BLOCK ASSEMBLY |
| NG |
 | REPLACE HV FLOOR UNDER WIRE |

 Related Data List


