Installation
INSTALLATION
PROCEDURE
1. INSTALL EGR COOLER ASSEMBLY
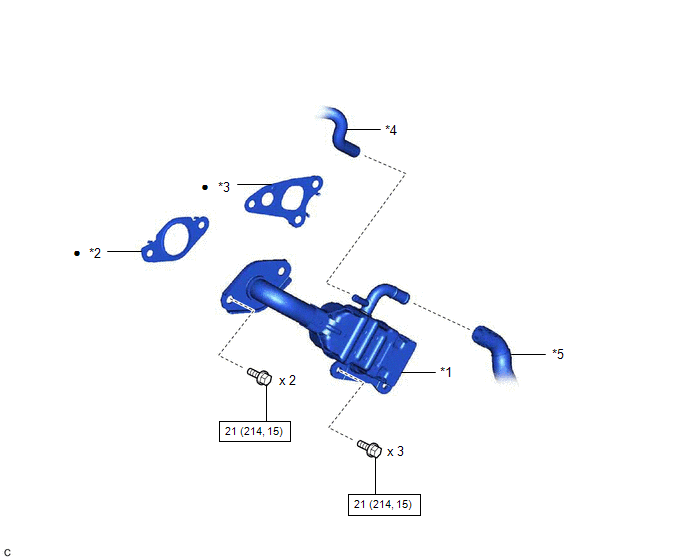
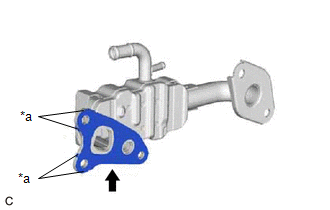
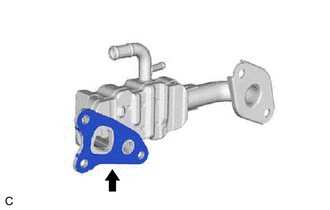
| (a) Install a new EGR cooler gasket to the EGR cooler assembly.
NOTICE: Make sure that the claws of the EGR cooler gasket are toward the EGR cooler assembly side. |
|
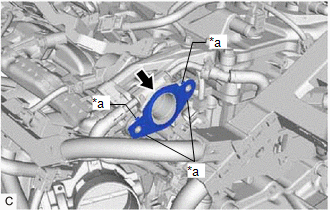
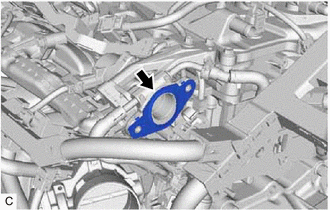
| (b) Install a new EGR valve gasket to the EGR valve assembly.
NOTICE: Make sure that the claws of the EGR valve gasket are toward the EGR valve assembly side. |
|
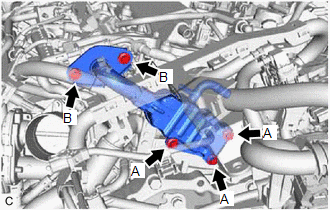
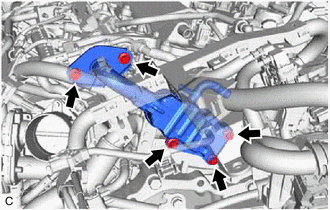
| (c) Temporarily install the EGR cooler assembly to the cylinder head sub-assembly and EGR valve assembly with the 5 bolts. |
|
(d) Tighten the 3 bolts (A).
Torque:
21 N·m {214 kgf·cm, 15 ft·lbf}
(e) Tighten the 2 bolts (B).
Torque:
21 N·m {214 kgf·cm, 15 ft·lbf}
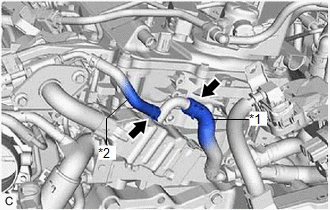
(f)
Connect the No. 3 water by-pass hose and No. 4 water by-pass hose to
the EGR cooler assembly and slide the 2 clips to secure them.
2. INSTALL INVERTER WITH CONVERTER ASSEMBLY
Click here 
3. ADD ENGINE COOLANT (for Engine)
Click here 
4. INSPECT FOR COOLANT LEAK (for Engine)
Click here 
5. INSPECT FOR EXHAUST GAS LEAK
Click here 
Removal
REMOVAL
CAUTION / NOTICE / HINT
The
necessary procedures (adjustment, calibration, initialization or
registration) that must be performed after parts are removed and
installed, or replaced during EGR cooler assembly removal/installation
are shown below.
Necessary Procedures After Parts Removed/Installed/Replaced |
Replaced Part or Performed Procedure |
Necessary Procedures | Effect/Inoperative Function when Necessary Procedure not Performed |
Link |
|
*1: When performing learning using the Techstream.
Click here  |
|
Auxiliary battery terminal is disconnected/reconnected |
Perform steering sensor zero point calibration |
Lane departure alert system (w/ Steering Control) |
 |
|
Pre-collision system |
| Intelligent clearance sonar system* |
|
Lighting System (for HV Model with Cornering Light) |
|
Memorize steering angle neutral point |
Parking assist monitor system |
 |
|
Panoramic view monitor system |
 |
|
Replacement of inverter with converter assembly |
Resolver learning |
- DTCs are stored
- Slight vibration at a vehicle speed of 5 km/h (3 mph) or less
- Shock or vibration during acceleration
|
 |
|
Replacement of ECM | Perform Vehicle Identification Number (VIN) registration |
MIL comes on |
 |
|
Gas leak from exhaust system is repaired |
Inspection After Repair |
- Poor idle, etc.
- Engine start function, etc.
|
 |
PROCEDURE
1. DRAIN ENGINE COOLANT (for Engine)
Click here

2. REMOVE INVERTER WITH CONVERTER ASSEMBLY
Click here 
3. REMOVE EGR COOLER ASSEMBLY
| (a) Slide the 2 clips and disconnect the No. 3 water by-pass hose and No. 4 water by-pass hose from the EGR cooler assembly. |
 |
|
*1 | No. 3 Water By-pass Hose | |
*2 | No. 4 Water By-pass Hose | | |
| (b) Remove the 5 bolts and EGR cooler assembly from the cylinder head sub-assembly and EGR valve assembly. |
|
| (c) Remove the EGR valve gasket from the EGR valve assembly. |
|
| (d) Remove the EGR cooler gasket from the EGR cooler assembly. |
|
