Components
COMPONENTS
ILLUSTRATION
|
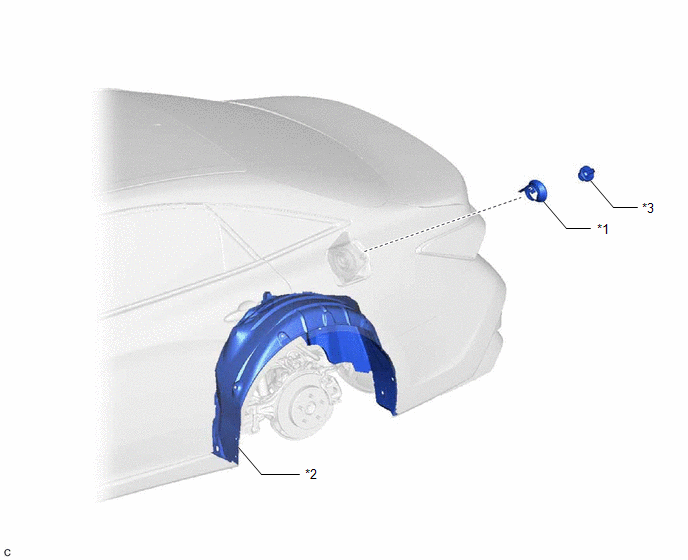
*1 | NO. 2 FUEL TANK FILLER PIPE PROTECTOR |
*2 | REAR WHEEL HOUSE LINER LH |
|
*3 | FUEL TANK CAP ASSEMBLY |
- | - |
Installation
INSTALLATION
PROCEDURE
1. INSTALL NO. 2 FUEL TANK FILLER PIPE PROTECTOR
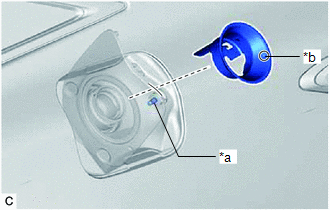
| (a) While aligning the matchmark of the No. 2 fuel tank filler pipe protector with the shaft of the fuel lid lock with motor assembly, install the No. 2 fuel tank filler pipe protector. |
|
(b) Return the rear wheel house liner LH to its original position and install the screws and clips.
(c) Install the fuel tank cap assembly.
2. INSTALL REAR WHEEL LH
Click here 
Removal
REMOVAL
PROCEDURE
1. REMOVE REAR WHEEL LH
Click here 
2. REMOVE NO. 2 FUEL TANK FILLER PIPE PROTECTOR
(a) Remove the fuel tank cap assembly.
(b) Remove all necessary screws and clips and pull back the rear wheel house liner LH to the extent that the fuel tank filler pipe sub-assembly can be accessed.
| (c) While holding the fuel tank filler pipe sub-assembly, disengage the claws of the No. 2 fuel tank filler pipe protector and pull the No. 2 fuel tank filler pipe protector off of the fuel tank filler pipe sub-assembly. |
|
Toyota Avalon (XX50) 2019-2022 Service & Repair Manual > Lighting (ext): Relay
On-vehicle InspectionON-VEHICLE INSPECTION PROCEDURE 1. INSPECT H-LP LH RELAY *a Component without harness connected (H-LP LH Relay) (a) Measure the resistance according to the value(s) in the table below. Standard Resistance: Tester Connection Condition Specified Condition 3 - 5 Voltage not applie ...