Fuel Level Sensor "A" Signal Stuck In Range (P04602A)
DESCRIPTION
Refer to DTC P046012.
Click here

|
DTC No. | Detection Item |
DTC Detection Condition | Trouble Area |
MIL | Memory |
Note |
| P04602A |
Fuel Level Sensor "A" Signal Stuck In Range |
The
change in the fuel sender gauge value is below the threshold when a
certain amount of fuel is calculated to have been consumed. (1 trip
detection logic). |
- Fuel sender gauge assembly
- ECM
| Comes on |
DTC stored | SAE Code: P0461 |
MONITOR DESCRIPTION
When
the fuel sender gauge assembly output value changes less than a
specified amount, when compared to the fuel consumption calculated from
the fuel injection volume, the ECM will detect a malfunction, illuminate
the MIL and store a DTC.
MONITOR STRATEGY
|
Related DTCs | P0461: Fuel level sensor stuck |
|
Required Sensors/Components (Main) | Fuel level sensor |
|
Required Sensors/Components (Related) |
- |
| Frequency of Operation |
Continuous |
| Duration |
Less than 10 seconds |
| MIL Operation |
1 driving cycles |
| Sequence of Operation |
None |
TYPICAL ENABLING CONDITIONS
|
Lost communication with instrument panel cluster control module (U0155) |
Not detected |
| Fuel level sensor circuit malfunction (P0462, P0463) |
Not detected |
|
Either of the following conditions is met |
Condition A or B |
| A. Battery voltage |
8 V or higher |
|
B. Check mode | On |
|
Fuel level sensor output via CAN |
Received |
| Engine switch |
On (IG) |
TYPICAL MALFUNCTION THRESHOLDS
|
One of the following conditions is met |
A, B or C |
| A. Accumulated volume of injected fuel during (a) is met at high fuel level |
36.9 L or more |
|
B. Accumulated volume of injected fuel during (a) is met at middle fuel level |
10.7 L or more |
|
C. Accumulated volume of injected fuel during (a) is met at low fuel level |
22.2 L or more |
| (a) Smoothed fuel level sensor output (Maximum - Minimum) |
Less than 3 L |
CONFIRMATION DRIVING PATTERN
HINT:
- After repair has been completed, clear the DTC and then check that the
vehicle has returned to normal by performing the following All Readiness
check procedure.
Click here 
- When clearing the permanent DTCs, refer to the "CLEAR PERMANENT DTC" procedure.
Click here 
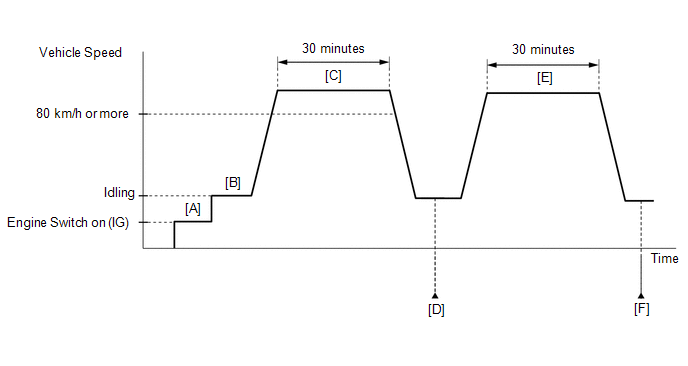
- Connect the Techstream to the DLC3.
- Turn the engine switch on (IG).
- Turn the Techstream on.
- Clear the DTCs (even if no DTCs are stored, perform the clear DTC procedure).
- Turn the engine switch off and wait for at least 30 seconds.
- Turn the engine switch on (IG) [A].
- Turn the Techstream on.
- Start the engine [B].
- Drive the vehicle at 80 km/h (50 mph) or more for 30 minutes [C].
- Enter the following menus: Powertrain / Engine / Trouble Codes [D].
- Read the pending DTCs.
HINT:
- If a pending DTC is output, the system is malfunctioning.
- If a pending DTC is not output, perform the following procedure.
- Enter the following menus: Powertrain / Engine / Utility / All Readiness.
- Input the DTC: P04602A.
- Check the DTC judgment result.
|
Techstream Display |
Description |
|
NORMAL |
- DTC judgment completed
- System normal
|
|
ABNORMAL |
- DTC judgment completed
- System abnormal
|
|
INCOMPLETE |
- DTC judgment not completed
- Perform driving pattern after confirming DTC enabling conditions
|
HINT:
- Drive the vehicle at 80 km/h (50 mph) or more for 30 minutes [E].
- Enter the following menus: Powertrain / Engine / Trouble Codes [F].
- Read the pending DTCs.
HINT:
- If a pending DTC is output, the system is malfunctioning.
- If a pending DTC is not output, perform the following procedure.
- Enter the following menus: Powertrain / Engine / Utility / All Readiness.
- Input the DTC: P04602A.
- Check the DTC judgment result.
|
Techstream Display |
Description |
|
NORMAL |
- DTC judgment completed
- System normal
|
|
ABNORMAL |
- DTC judgment completed
- System abnormal
|
|
INCOMPLETE |
- DTC judgment not completed
- Perform driving pattern after confirming DTC enabling conditions
|
HINT:
CAUTION / NOTICE / HINT
HINT:
Read
freeze frame data using the Techstream. The ECM records vehicle and
driving condition information as freeze frame data the moment a DTC is
stored. When troubleshooting, freeze frame data can help determine if
the vehicle was moving or stationary, if the engine was warmed up or
not, if the air fuel ratio was lean or rich, and other data from the
time the malfunction occurred.
PROCEDURE
| 1. |
INTERVIEW THE CUSTOMER |
(a) Interview the customer for details about when the they refuel the vehicle.
HINT:
When
the fuel tank is full, if the vehicle is repeatedly driven a short
distance and then refueled, the fuel sender gauge output value will not
change. In this case, the ECM may judge that the fuel sender gauge is
stuck and store DTC P04602A. If the vehicle was driven in this manner,
as the DTC was stored due to a user action, clear the DTCs without
performing troubleshooting and return the vehicle to the customer.
|
NEXT |
 | |
| 2. |
INSPECT FUEL SENDER GAUGE ASSEMBLY |
(a) Remove the fuel sender gauge assembly.
Click here 
(b) Inspect the fuel sender gauge assembly.
Click here 
| OK |
 | CHECK FOR INTERMITTENT PROBLEMS |
| NG |
 | REPLACE FUEL SENDER GAUGE ASSEMBLY |
Brake Switch "A"/"B" Signal Cross Coupled (P05042B)
DESCRIPTION
The stop light
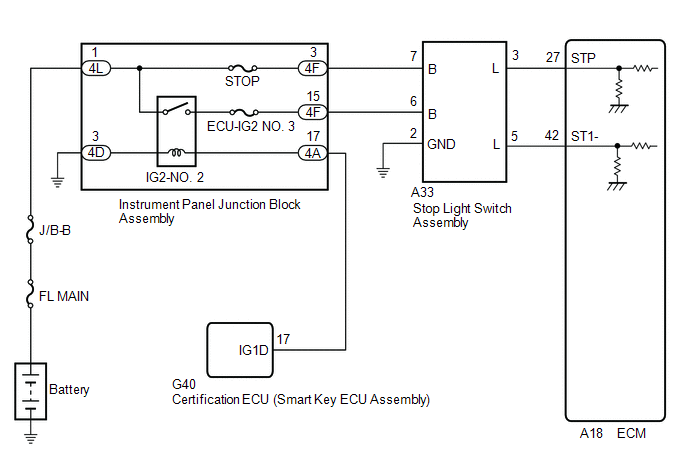
switch assembly is a duplex system that transmits two signals: STP and
ST1-. These two signals are used by the ECM to monitor whether or not
the brake system is working properly. If the signals, which indicate the
brake pedal is being depressed and released, are detected
simultaneously, the ECM interprets this as a malfunction in the stop
light switch assembly and stores this DTC.
HINT:
The normal signal conditions are as shown in the table below.
|
Signal (ECM Terminal) | Brake Pedal Released |
In Transition | Brake Pedal Depressed |
|
STP | OFF |
ON | ON |
|
ST1- | ON |
ON | OFF |
- [OFF] denotes ground potential.
- [ON] denotes battery potential (+B).
On the Techstream, Data List item Stop Light SW is ON when the brake pedal is depressed.
|
DTC No. | Detection Item |
DTC Detection Condition | Trouble Area |
MIL | Memory |
Note |
| P05042B |
Brake Switch "A"/"B" Signal Cross Coupled |
Conditions (a) and (b) are met for 0.5 seconds or more (1 trip detection logic):
(a) Engine switch on (IG) (b) STP signal OFF when ST1- signal OFF |
- Open or short in stop light switch signal circuit
- Stop light switch assembly
- Instrument panel junction block assembly
- ECM
| Does not come on |
DTC stored | SAE Code: P0504 |
WIRING DIAGRAM
CAUTION / NOTICE / HINT
NOTICE:
Inspect the fuses for circuits related to this system before performing the following procedure.
HINT:
- Stop light switch assembly conditions can be checked using the Techstream.
- Connect the Techstream to the DLC3.
- Turn the engine switch on (IG).
- Turn the Techstream on.
- Enter the following menus: Powertrain / Engine / Data List / Stop Light SW.
- Check the Data List indication when the brake pedal is depressed and released.
|
Brake Pedal Operation |
Stop Light SW |
|
Depressed |
ON |
|
Released |
OFF |
- Read freeze frame data using the Techstream. The ECM records vehicle and
driving condition information as freeze frame data the moment a DTC is
stored. When troubleshooting, freeze frame data can help determine if
the vehicle was moving or stationary, if the engine was warmed up or
not, if the air fuel ratio was lean or rich, and other data from the
time the malfunction occurred.
PROCEDURE
|
1. | CHECK TERMINAL VOLTAGE (POWER SOURCE OF STOP LIGHT SWITCH ASSEMBLY) |
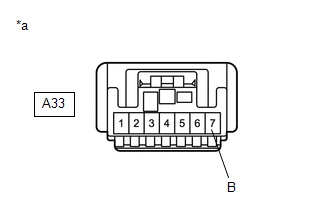
|
*a | Front view of wire harness connector
(to Stop Light Switch Assembly) |
(a) Disconnect the stop light switch assembly connector.
(b) Measure the voltage according to the value(s) in the table below.
Standard Voltage:
|
Tester Connection | Condition |
Specified Condition |
|
A33-7 (B) - Body ground |
Always | 11 to 14 V |
| NG |
 | GO TO STEP 11 |
|
OK |
 | |
| 2. |
CHECK TERMINAL VOLTAGE (POWER SOURCE OF STOP LIGHT SWITCH ASSEMBLY) |
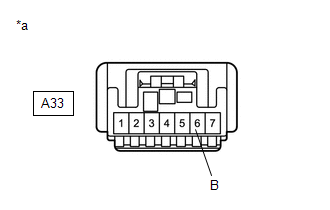
|
*a | Front view of wire harness connector
(to Stop Light Switch Assembly) |
(a) Disconnect the stop light switch assembly connector.
(b) Turn the engine switch on (IG).
(c) Measure the voltage according to the value(s) in the table below.
Standard Voltage:
|
Tester Connection | Condition |
Specified Condition |
|
A33-6 (B) - Body ground |
Engine switch on (IG) |
11 to 14 V |
| NG |
 | GO TO STEP 6 |
|
OK |
 | |
| 3. |
CHECK HARNESS AND CONNECTOR (STOP LIGHT SWITCH ASSEMBLY - BODY GROUND) |
(a) Disconnect the stop light switch assembly connector.
(b) Measure the resistance according to the value(s) in the table below.
Standard Resistance:
|
Tester Connection | Condition |
Specified Condition |
|
A33-2 (GND) - Body ground |
Always | Below 1 Ω |
| NG |
 | REPAIR OR REPLACE HARNESS OR CONNECTOR |
|
OK |
 | |
| 4. |
CHECK TERMINAL VOLTAGE (STP AND ST1- VOLTAGE) |

|
*a | Brake Pedal Depressed |
*b | Brake Pedal Released |
|
*c | Front view of wire harness connector
(to ECM) | - |
- |
(a) Disconnect the ECM connector.
(b) Turn the engine switch on (IG).
(c) Measure the voltage according to the value(s) in the table below.
Standard Voltage:
|
Tester Connection | Brake Pedal Operation |
Specified Condition |
|
A18-42 (ST1-) - Body ground |
Released | 7.5 to 14 V |
|
Depressed | Below 1.5 V |
|
A18-27 (STP) - Body ground |
Released | Below 1.5 V |
|
Depressed | 7.5 to 14 V |
| OK |
 | REPLACE ECM |
|
NG |
 | |
| 5. |
CHECK HARNESS AND CONNECTOR (STOP LIGHT SWITCH ASSEMBLY - ECM) |
(a) Disconnect the stop light switch assembly connector.
(b) Disconnect the ECM connector.
(c) Measure the resistance according to the value(s) in the table below.
Standard Resistance:
|
Tester Connection | Condition |
Specified Condition |
|
A33-5 (L) - A18-42 (ST1-) |
Always | Below 1 Ω |
|
A33-3 (L) - A18-27 (STP) |
Always | Below 1 Ω |
|
A33-5 (L) or A18-42 (ST1-) - Body ground and other terminals |
Always | 10 kΩ or higher |
|
A33-3 (L) or A18-27 (STP) - Body ground and other terminals |
Always | 10 kΩ or higher |
| OK |
 | REPLACE STOP LIGHT SWITCH ASSEMBLY |
| NG |
 | REPAIR OR REPLACE HARNESS OR CONNECTOR |
| 6. |
CHECK HARNESS AND CONNECTOR (INSTRUMENT PANEL JUNCTION BLOCK ASSEMBLY - STOP LIGHT SWITCH ASSEMBLY) |
(a) Disconnect the instrument panel junction block assembly connector.
(b) Disconnect the stop light switch assembly connector.
(c) Measure the resistance according to the value(s) in the table below.
Standard Resistance:
|
Tester Connection | Condition |
Specified Condition |
| 4F-15 - A33-6 (B) |
Always | Below 1 Ω |
|
4F-15 or A33-6 (B) - Body ground and other terminals |
Always | 10 kΩ or higher |
| NG |
 | REPAIR OR REPLACE HARNESS OR CONNECTOR |
|
OK |
 | |
| 7. |
CHECK HARNESS AND CONNECTOR (INSTRUMENT PANEL JUNCTION BLOCK ASSEMBLY - BODY GROUND) |
(a) Disconnect the instrument panel junction block assembly connector.
(b) Measure the resistance according to the value(s) in the table below.
Standard Resistance:
|
Tester Connection | Condition |
Specified Condition |
|
4D-3 - Body ground | Always |
Below 1 Ω |
| NG |
 | REPAIR OR REPLACE HARNESS OR CONNECTOR |
|
OK |
 | |
| 8. |
CHECK INSTRUMENT PANEL JUNCTION BLOCK ASSEMBLY (POWER SOURCE) |
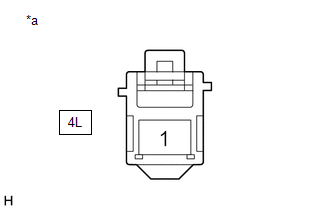
|
*a | Front view of wire harness connector
(to Instrument Panel Junction Block Assembly) |
(a) Disconnect the instrument panel junction block assembly connector.
(b) Measure the voltage according to the value(s) in the table below.
Standard Voltage:
|
Tester Connection | Condition |
Specified Condition |
|
4L-1 - Body ground | Always |
11 to 14 V |
| NG |
 | REPAIR OR REPLACE HARNESS OR CONNECTOR (BATTERY - INSTRUMENT PANEL JUNCTION BLOCK ASSEMBLY) |
|
OK |
 | |
| 9. |
CHECK HARNESS AND CONNECTOR (INSTRUMENT PANEL JUNCTION BLOCK ASSEMBLY - CERTIFICATION ECU (SMART KEY ECU ASSEMBLY)) |
(a) Disconnect the instrument panel junction block assembly connector.
(b) Disconnect the certification ECU (smart key ECU assembly) connector.
(c) Measure the resistance according to the value(s) in the table below.
Standard Resistance:
|
Tester Connection | Condition |
Specified Condition |
| 4A-17 - G40-17 (IG1D) |
Always | Below 1 Ω |
|
4A-17 or G40-17 (IG1D) - Body ground and other terminals |
Always | 10 kΩ or higher |
| NG |
 | REPAIR OR REPLACE HARNESS OR CONNECTOR |
|
OK |
 | |
| 10. |
CHECK SMART KEY SYSTEM |
(a) Check the smart key system.
Click here 
| OK |
 | REPLACE INSTRUMENT PANEL JUNCTION BLOCK ASSEMBLY |
| NG |
 | REPAIR SMART KEY SYSTEM |
| 11. |
CHECK HARNESS AND CONNECTOR (INSTRUMENT PANEL JUNCTION BLOCK ASSEMBLY - STOP LIGHT SWITCH ASSEMBLY) |
(a) Disconnect the instrument panel junction block assembly connector.
(b) Disconnect the stop light switch assembly connector.
(c) Measure the resistance according to the value(s) in the table below.
Standard Resistance:
|
Tester Connection | Condition |
Specified Condition |
| 4F-3 - A33-7 (B) |
Always | Below 1 Ω |
|
4F-3 or A33-7 (B) - Body ground and other terminals |
Always | 10 kΩ or higher |
| NG |
 | REPAIR OR REPLACE HARNESS OR CONNECTOR |
|
OK |
 | |
| 12. |
CHECK INSTRUMENT PANEL JUNCTION BLOCK ASSEMBLY (POWER SOURCE) |
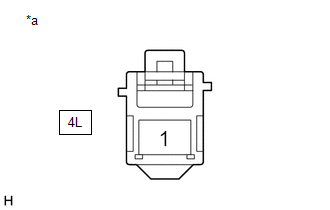
|
*a | Front view of wire harness connector
(to Instrument Panel Junction Block Assembly) |
(a) Disconnect the instrument panel junction block assembly connector.
(b) Measure the voltage according to the value(s) in the table below.
Standard Voltage:
|
Tester Connection | Condition |
Specified Condition |
|
4L-1 - Body ground | Always |
11 to 14 V |
| OK |
 | REPLACE INSTRUMENT PANEL JUNCTION BLOCK ASSEMBLY |
| NG |
 | REPAIR OR REPLACE HARNESS OR CONNECTOR (BATTERY - INSTRUMENT PANEL JUNCTION BLOCK ASSEMBLY) |
Actuator Supply Voltage "A" Stuck On (P06579E)
MONITOR DESCRIPTION
The ECM
monitors the output voltage to the throttle actuator. This self-check
ensures that the ECM is functioning properly. The output voltage is
usually 0 V when the engine switch is turned off. If the output voltage
is 7 V or higher when the engine switch is turned off, the ECM
illuminates the MIL and stores this DTC when the engine switch is turned
on (IG).
|
DTC No. | Detection Item |
DTC Detection Condition | Trouble Area |
MIL | Memory |
Note |
| P06579E |
Actuator Supply Voltage "A" Stuck On |
A throttle actuator power supply error (1 trip detection logic). |
ECM | Comes on |
DTC stored | SAE Code: P0657 |
MONITOR STRATEGY
|
Related DTCs | P0657: Electronic throttle actuator supply voltage circuit performance |
|
Required Sensors/Components (Main) | ECM |
|
Required Sensors/Components (Related) | Throttle actuator |
|
Frequency of Operation | Once per driving cycle |
|
Duration | 1 second |
| MIL Operation |
Immediate |
| Sequence of Operation |
None |
TYPICAL ENABLING CONDITIONS
|
Monitor runs whenever the following DTCs are not stored |
None |
| Both of the following conditions are met |
- |
| Battery voltage |
8 V or higher |
| Command to electronic throttle actuator power |
Off |
TYPICAL MALFUNCTION THRESHOLDS
|
Electronic throttle actuator power supply voltage | 7 V or higher |
CONFIRMATION DRIVING PATTERN
HINT:
- After repair has been completed, clear the DTC and then check that the
vehicle has returned to normal by performing the following All Readiness
check procedure.
Click here 
- When clearing the permanent DTCs, refer to the "CLEAR PERMANENT DTC" procedure.
Click here 
- Connect the Techstream to the DLC3.
- Turn the engine switch on (IG).
- Turn the Techstream on.
- Clear the DTCs (even if no DTCs are stored, perform the clear DTC procedure).
- Turn the Techstream off.
- Turn the engine switch off.
- Disconnect the Techstream.
- Disconnect the cable from the negative (-) battery terminal and wait for 1 minute.
- Connect the cable to the negative (-) battery terminal.
- Turn the engine switch on (IG) [A].
- Wait 10 seconds or more.
- Turn the engine switch off [B].
- Wait 15 seconds or more.
- Connect the Techstream to the DLC3.
- Turn the engine switch on (IG).
- Turn the Techstream on.
- Wait 5 seconds or more [C].
- Enter the following menus: Powertrain / Engine / Trouble Codes [D].
- Read the pending DTCs.
HINT:
- If a pending DTC is output, the system is malfunctioning.
- If a pending DTC is not output, perform the following procedure.
- Enter the following menus: Powertrain / Engine / Utility / All Readiness.
- Input the DTC: P06579E.
- Check the DTC judgment result.
|
Techstream Display |
Description |
|
NORMAL |
- DTC judgment completed
- System normal
|
|
ABNORMAL |
- DTC judgment completed
- System abnormal
|
|
INCOMPLETE |
- DTC judgment not completed
- Perform driving pattern after confirming DTC enabling conditions
|
HINT:
CAUTION / NOTICE / HINT
NOTICE:
After
turning engine switch off, waiting time may be required before
disconnecting the cable from the negative (-) battery terminal.
Therefore, make sure to read the disconnecting the cable from the
negative (-) battery terminal notices before proceeding with work.
Click here

HINT:
Read
freeze frame data using the Techstream. The ECM records vehicle and
driving condition information as freeze frame data the moment a DTC is
stored. When troubleshooting, freeze frame data can help determine if
the vehicle was moving or stationary, if the engine was warmed up or
not, if the air fuel ratio was lean or rich, and other data from the
time the malfunction occurred.
PROCEDURE
(a) Connect the Techstream to the DLC3.
(b) Turn the engine switch on (IG).
(c) Turn the Techstream on.
(d) Clear the DTC.
Powertrain > Engine > Clear DTCs (e) Turn the engine switch off.
|
NEXT |
 | |
| 2. |
READ OUTPUT DTC (DTC P06579E) |
(a) Disconnect the cable from the negative (-) battery terminal and wait for 1 minute.
(b) Connect the cable to the negative (-) battery terminal.
(c) Turn the engine switch on (IG).
(d) Wait 10 seconds or more.
(e) Turn the engine switch off.
(f) Wait 15 seconds or more.
(g) Connect the Techstream to the DLC3.
(h) Turn the engine switch on (IG).
(i) Wait 5 seconds or more.
(j) Turn the Techstream on.
(k) Enter the following menus: Powertrain / Engine / Trouble Codes.
(l) Read the DTCs.
Powertrain > Engine > Trouble Codes
|
Result | Proceed to |
|
DTCs are not output | A |
|
DTC P06579E is output |
B |
| A |
 | CHECK FOR INTERMITTENT PROBLEMS |
| B |
 | REPLACE ECM |


